Since '02 xBhp is different things to different people. From a close knit national community of bikers to India's only motorcycling lifestyle magazine and a place to make like-minded biker friends. Join us

Castrol Power 1

Check the helmet from inside.

Our Partner

Announcement

Collapse
No announcement yet.

Brake fluid replacing/brake bleeding-RTR180

Collapse
X
 
  • Filter
  • Time
  • Show
Clear All
new posts

  • Brake fluid replacing/brake bleeding-RTR180

    Brake fluid replacing/bleeding:
    Motorcycles have up to two brake fluid reservoirs, one for the front, usually found on the handlebars and one for the back. Both should be checked regularly. Topping up should only be done from a new, sealed bottle as brake fluid tends to absorb moisture over time.When the brake fluid turns from clear to a darker colour,its time to change the fluid.Beware - brake fluid, if spilt on paintwork eats right through the bare metal.

    #When undertaking the process of bleeding brakes on your motorcycle, prepare by covering up the relevant components to prevent them being affected by brake fluid. It is a very corrosive substance that can quickly cause damage to surfaces that it falls onto.Cover the relevant bike parts with old rags and keep a bucket of soapy water to hand in case there is a spill so it is easy to quickly wash away.
    #Be patient when bleeding brakes as it can take some time and you should avoid rushing it.The entire process of opening and closing the bleeder nut may need to be repeated several times to complete the task.

    Make sure you have the following tools to bleed the brake fluid,
    Tools needed:
    1)One bottle(250ml) of DOT3 or DOT4 brake fluid as per your choice.Here I am using Castrol DOT4 fluid.
    2)10mm ring/open end spanner
    3)8mm ring/open end spanner(for rear brake)
    4)philips screw driver
    5)Rags
    6)a clear plastic tube for bleeding
    7)one container/bottle

    For the FRONT brake
    :
    Place the bike on centre stand
    Procedure
    :
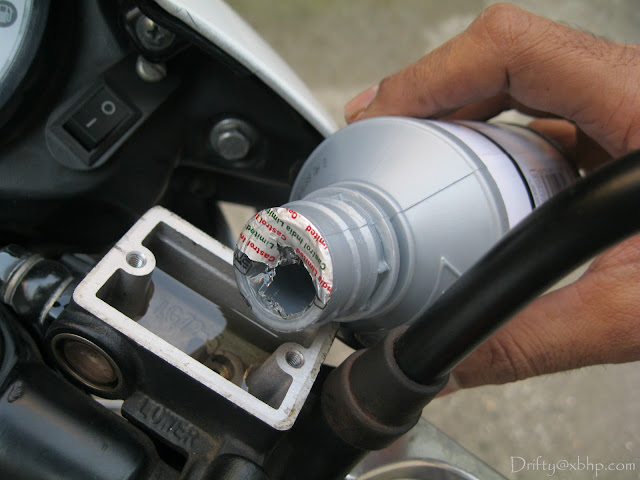
    The CASTROL DOT4 brake fluid

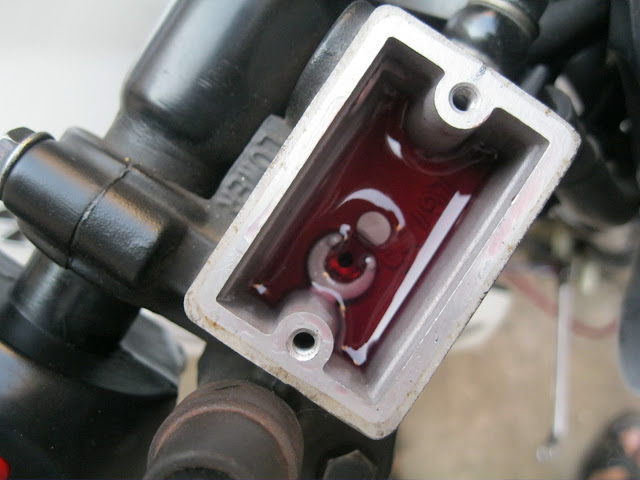
    Step1:Here is the master cylinder,we can see the Dot3 brake fluid through the window


    Remove these two screws..


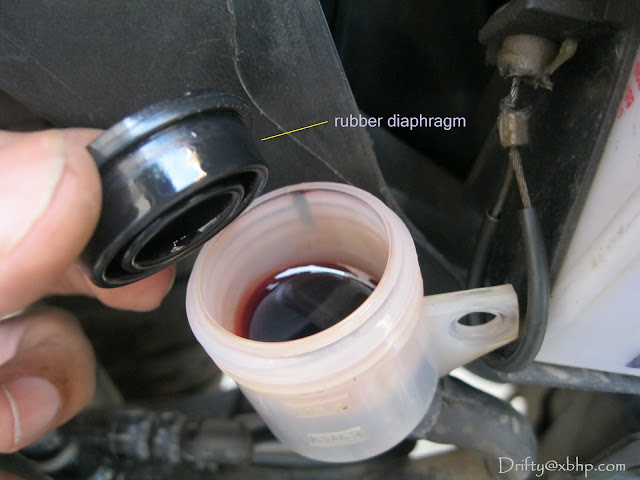
    Remove the baffle and the diaphragm..


    The old DOT3 fluid can be seen in the master cylinder..

    Step 2:
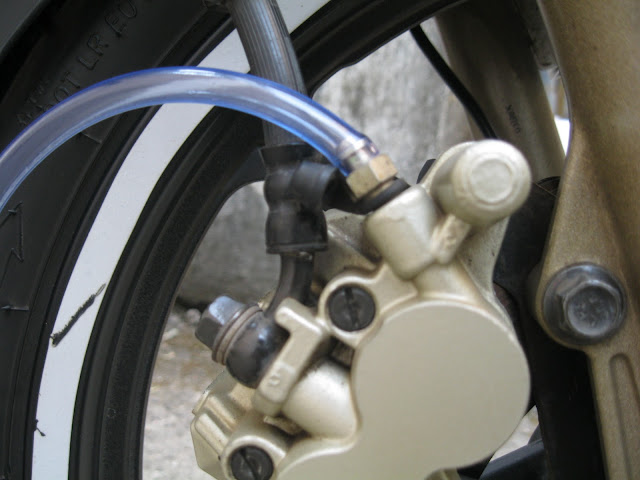
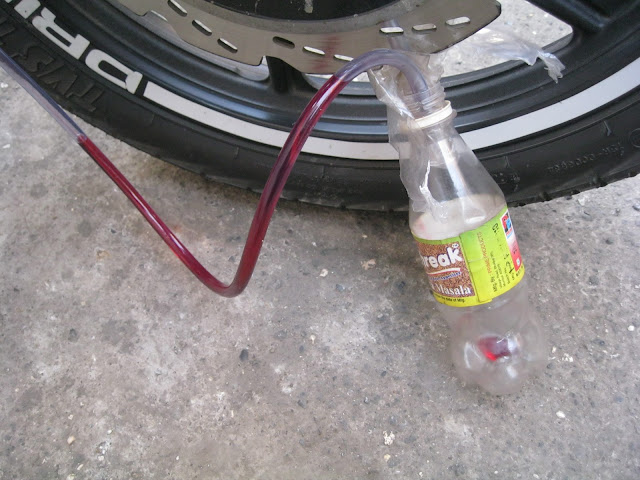
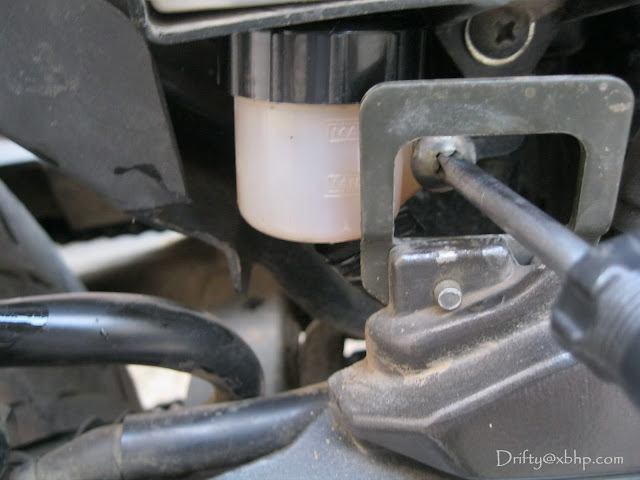
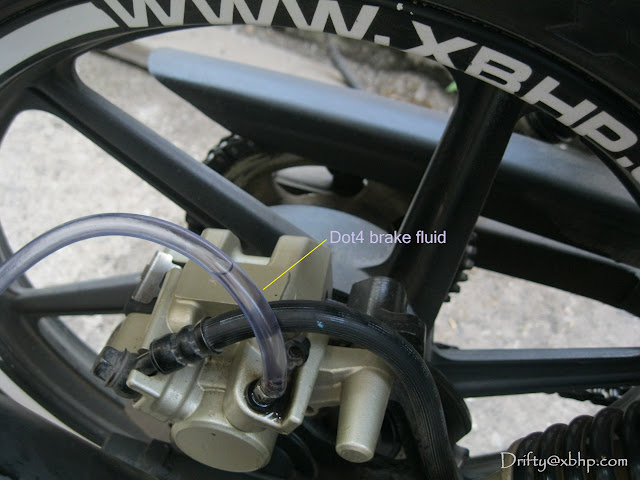
    Remove the cap above the bleeder nut and attach a clear tube to it,while the other end attached to the container so that the fluid can flow in it when the bleeder nut is loosened.


    Step3:

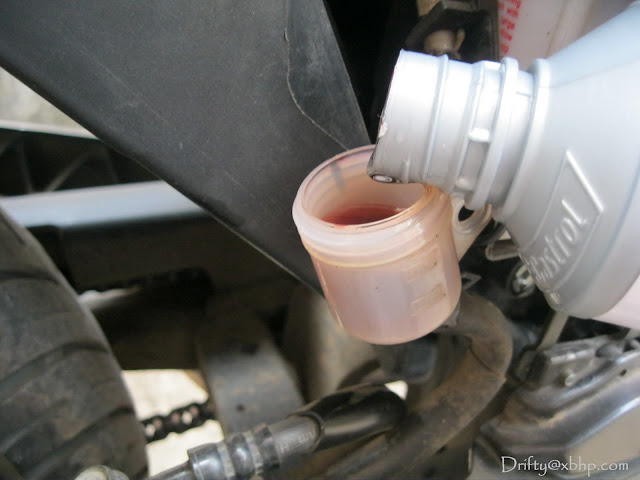
    Make sure the reserviour(master cylinder) is filled so that no air enters the circuit.
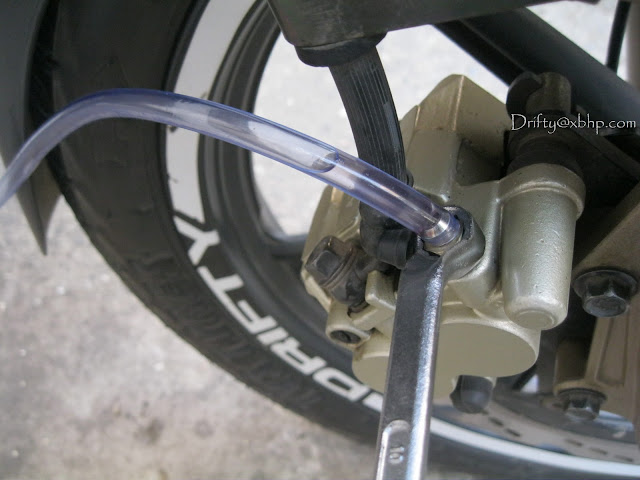
    Now loosen the bleeder screw a little using a 10mm spanner,you will see brake fluid coming out through the bleeder nut and to the tube.


    Step 4:

    Now press the front brake lever so the old fluid is forced through the tube into the container.But wait,Keep holding the brake lever completely and tighten the bleeder screw again to prevent air entering in the circuit AND then release the brake lever.This part in bold is very important!


    Repeat step 3 & step 4 several times till you see clear DOT4 brake fluid coming out through the tube.Each time,you had to loosen the bleeder nut ,press the brake lever-the fluid will come out due to pressure,again tighten the bleeder nut and then only release the brake lever.

    Step 5:Keep checking the reserviour after a few pumps,fill it till the brim,NEVER let it run dry.


    After a few pumps,you will see clear DOT4 brake fluid coming through the bleeder nut.Now,loosen the bleeder nut again,press the brake lever and tighten the nut fully,release the lever.


    Fill the master cylinder to required proportion,dont fill upto the brim as the rubber diaphragm will occupy rest of the place.


    Put back everything in reverse order,remove the tube from the bleeder nut.


    For REAR BRAKE:
    Procedure is the same as above...


    TIPS:
    1)Never release brake lever with bleeder nutloose,it will suck air into braking system and degrade the braking efficiency.
    2)When using a different grade brake fluid as in my case,make sure the entire brake fluid has been removed from the braking system
    3)You must keep re-filling the master cylinder with brake fluid,it must never get empty.
    4)Do not keep the brake fluid bottle open for too long as it will absorb moisture.
    A word of warning: as with all home maintenance - and especially with something as critical to your safety as brakes - don't attempt the job unless you have got all the right tools to hand and you are confident enough to see it through!
    Last edited by Drifty; 12-21-2011, 03:24 PM.

    D.I.Y-Valve clearance setting RTR180
    D.I.Y-RTR180 brake fluid replacing/brake bleeding
    D.I.Y-RTR180 brake pad replacing/cleaning
    Exploded view of Mikuni BS-29 carb

    A motorcycle functions entirely in accordance with the laws of reason, and a study of the art of motorcycle maintenance is really a miniature study of the art of rationality itself.

  • #2
    DIY thread approved.

    Pretty neat!
    (Been There Done That) x 3.25

    Comment


    • #3
      very good article.we should appreicate for your work as you have again proved a picture is more than the thsound words.BTW I prefer drum brake.
      2030 " we used to ride petrol motorbike and you can not even afford one drop of it"

      Comment


      • #4
        Nicely done.What was the cost of DOT4 oil?.Also how much amount do you think is required if i was changing just the front brake fluid?

        Comment


        • #5
          Originally posted by Ghost11 View Post
          Nicely done.What was the cost of DOT4 oil?.Also how much amount do you think is required if i was changing just the front brake fluid?
          Thanks.Castrol DOT4 (250ml) brake fluid cost INR99.You will need half the quantity of the 250ml bottle if you are completely replacing the fluid from the front brake lines.
          Originally posted by sun105 View Post
          very good article.we should appreicate for your work as you have again proved a picture is more than the thsound words.BTW I prefer drum brake.
          Thanks for the kind words.
          Last edited by Drifty; 12-17-2011, 04:06 PM.

          D.I.Y-Valve clearance setting RTR180
          D.I.Y-RTR180 brake fluid replacing/brake bleeding
          D.I.Y-RTR180 brake pad replacing/cleaning
          Exploded view of Mikuni BS-29 carb

          A motorcycle functions entirely in accordance with the laws of reason, and a study of the art of motorcycle maintenance is really a miniature study of the art of rationality itself.

          Comment


          • #6
            Uhum Uhum wat do we say..??

            fb ki language me only 1 thing

            ""SUPERLIKE"".

            really very helpfull for noobs and people like me who dont have good mechanics around.

            Thanks a lot...!!
            STUNTING IS IN MY DNA

            BIG BORE KIT FOR RTR 180
            PORTED HEAD ON APACHE RTR 180
            D.I.Y ON OIL CHANGE FOR APACHE RTR
            SPARE PARTS CATALOUGE FOR RTR 180

            Comment


            • #7
              Nice job

              TIP: Don't spill brake fluid, it would react with paint. Also, no skin contact with old brake fluid, will cause reaction.
              #RetiredRider
              #KeyboardWarrior

              Comment


              • #8
                nice article dude,

                i went throught it however i have some questions....

                when repeating the loosening--> pulling brake lever --> tightening --> releasing brake lever what to look for?

                and finally as per my understanding the conclusion is bleeding means removing the air from the braking system. and if we dont want to replace the brake fluid we will have to keep on adding the brake fluid which came out of the bleeder nut to the reservoir.

                and when we want to replace the brake fluid we have to remove the oil completely, fill the reservoir and then bleed the system to remove the air?
                Timon: Orange Yamaha FZ16 2009
                Optimus: Red Mahindra XUV500 W8 FWD 2013
                Atom: Red Tata Nano XTA 2016
                Pumba: Red Harley Street 750

                Comment


                • #9
                  Hi Drifty,

                  You have replaced the brake fluid from DOT 3 to DOT 4. Even new DOT 3 fluid is red in colour and new DOT 4 is colourless. It is 100% fresh as it is changed from red DOT 3 to DOT 4. My Pulsar 180 has DOT 4 as it appears colourless when seen through the master cylinder circle window.

                  Generally oils of different type/colour will not mix together but they tend to form colourful layers when poured in a glass. If I replace old DOT 4 fluid with new DOT 4 fluid then how can I judge that it is completely fresh when both old and new DOT 4 can mix together as we have to constantly keep the master cylinder full with fluid at all times even when replacing it.

                  In other words if I pour 5 litres dirty water in an empty bucket and then make a hole at the bottom to spill the water out and then pour the same amount of 5 litres fresh water from top we can still see most of the dirt floating on top. Unless we keep on pouring more fresh water we can flush the dirty water making it 99% fresh. 1% of dirt may float on top.

                  To overcome this I will replace it with new DOT 3 fluid by flushing out the old DOT 4 fluid and when done we can say it is 100% fresh DOT 3 fluid as its colour itself is red. Then I will replace it with new DOT 4 fluid after flushing out the new DOT 3 fluid. Then we can say it is 100% fresh DOT 4 fluid.

                  In short correct me if I am wrong here:

                  1. Attach tube to bleeder nut and loosen the nut a little.
                  2. Press and hold the brake lever until the nut is closed while it pushes the old fluid out. Release the brake lever ONLY when the nut is closed.
                  3.NEVER leave the master cylinder empty. Constantly keep master cylinder full by pouring new fluid in it.
                  4. DANGER: Don't spill the fluid on painted parts of bike as it eats away the paint. Cover all the painted parts with some cloth before performing this operation.
                  5.Once the DOT 3 or 4 is opened use it within a month. Don't leave the bottle opened for hours as it absorbs moisture. Close it when not in use.

                  How often do I have to change the brake fluid in terms of km or years?
                  How often do I have to change the disk brake pads? How will I know whether the disk brake pads are damaged or worn out?
                  Can someone show a picture where the spark plug is located in Pulsar 180UG4. Can I change it myself?

                  Comment


                  • #10
                    How often do I have to change the brake fluid?

                    how do i know when the brake fluid is contaminated and needs to be changed?
                    "A brother might stab you in the back, a woman certainly will, but a bike will never let you down." ―Johnny Klebitz

                    Comment


                    • #11
                      great work

                      @Drifty : That was an awesome guide. Explained like Spoon feeding

                      I followed it for the fluid change in my Royal Enfield and job was done in 15 minutes . I have also tried to create a guide for RE electra.
                      See my Blog URL :
                      Silver Bullet: How to replace/bleed disk fluid in Royal Enfield Electra 5s

                      My guide is not as detailed as yours but still i tried to follow your way of detailing.

                      Comment


                      • #12
                        Hey drifty. I followed your guide for replacing worn out disc brake pads and i did it perfectly.

                        I was trying to change the brake oil as well but the screw was stuck and in the process of removing it one of the screws has worn out and i cannot use the philips screw driver anymore in it. Any ideas on how to loosen it?

                        Comment


                        • #13
                          Originally posted by sunilyo View Post
                          Hey drifty. I followed your guide for replacing worn out disc brake pads and i did it perfectly.

                          I was trying to change the brake oil as well but the screw was stuck and in the process of removing it one of the screws has worn out and i cannot use the philips screw driver anymore in it. Any ideas on how to loosen it?
                          The head of screw is made of very soft metal and it can get damaged even if screwdriver slip even once. You should no more worsen the condition. Take it to a mechanic , mechanics generally do it this way :
                          They fix the screwdriver on the worn out screw --> hit the screwdriver head with small hammer to create grip on screw --> Use slight force perpendicular as well while rotating it.
                          You should not try it otherwise you may damage the entire assembly !!!!

                          Comment


                          • #14
                            Originally posted by amardeep2006 View Post
                            The head of screw is made of very soft metal and it can get damaged even if screwdriver slip even once. You should no more worsen the condition. Take it to a mechanic , mechanics generally do it this way :
                            They fix the screwdriver on the worn out screw --> hit the screwdriver head with small hammer to create grip on screw --> Use slight force perpendicular as well while rotating it.
                            You should not try it otherwise you may damage the entire assembly !!!!
                            I too was thinking on similar lines. Thanks amardeep2006 for the advise. Will do it accordingly.

                            Comment


                            • #15
                              worst brake bleeding experience at Yamaha service

                              Wish I did this myself instead of taking it to Yamaha service, thinking that they'd do the whole process in a professional way. This is what happened:

                              - The mechanic removed the master cylinder plates and the rubber diaphragm and then directly opened the bleeder nut without connecting a tube to collect old fluid After seeing this, I was running in to the service bay from customer lounge to rescue my bike from that maniac mechanic.
                              - By that time, he pumped out the fluid completely by pressing the brake lever actively and let the fluid flow on top of disc pad and the wheel. Asked him to wipe off the spilled fluid immediately from the wheel and disc pad.
                              - He used a dirty grease filled cloth to clean the interiors of master cylinder. I shouted at him and all the mechanics were staring at me as though I've done something wrong. Then he used a fresh clean cloth.
                              - closes the bleeder nut and starts filling in the DOT4 fluid from an open bottle (TVS DOT4 brake fluid) by spilling it all over the front fairing. I stopped him and then the supervisor intervened and justified that "we don't keep small quantity bottles and once we open the bottle it'll be consumed in a day. Please wait in customer lounge, will inform you once your vehicle is ready" Hmmm, that was rude. This proved their transparency.
                              - upon filling the fluid to some extent, he started pressing the brake lever actively thinking that it'll clear off air blocks completely (after closing the bleeder valve). After 10-12 repetitions, topped up the master cylinder and that's it done.

                              Prayed God that I must reach home safely without any tragedy. Didn't have any problem for a day. On the 2nd day, I felt a sudden release (a sec or so) in brake when I was slowing down for a speed breaker Thank God, nothing serious happened.

                              Now, I'm going to bleed the brakes properly myself. Thanks for all your info.

                              Vehicle: Yamaha Fazer 150cc
                              Service station: Panache Yamaha, OMR, Bangalore (greatly appreciate any suggestions for a better service station for Yamaha bikes).

                              Comment

                              Working...
                              X