


 Tweet
Tweet
Hi guys, I'm a proud owner of a ZMA-R 2011. And as you all know ZMA's are very notorious for their 'Tappet Noise' issues. So here's a DIY guide I made for everyone out there who's facing the above issue. This guide's especially made for starters like me who's not at all familiar with a bike's internals.
Symptoms:
There will be a sewing machine type of noise when you start the bike, which will decrease as the engine gets hotter. Cause when the engines hot, the thingi's expand thus filling the unnecessary space resulting in reduced noise.
Necessities(Before doing the deed.):
1. Pair of Tappet Bolt O'Rings (Rs.12/-).

2. Fevibond Adhesive (Rs.13/-).

3. Hero Honda Special Tappet Tool (Rs.50/-).

4. Modified Feeler Guage (Will get back to the cause of modification later.).
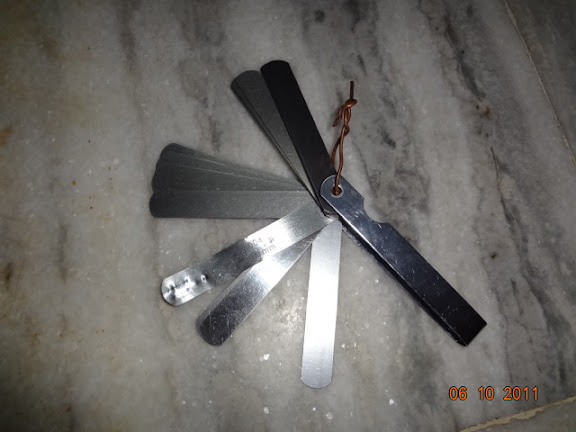
5. Special Retrieval Tool (Made by KB100 & Aneesh@4Ghz).

We had to make this tool cause the used to hold the blades of the feeler guage got loose and fell into the valve hole. And we went through hell to get it out of there.
Procedure:
MAKE SURE THE BIKE's BEEN IDLE FOR AT LEAST 3Hrs.
1. Remove side panels.

2. Remove tank.

3. Remove fairing & Store in a safe place, since its the most fragile part of our bike.

4. Remove both 'Tapet Cover Bolt's' and use only, I repeat use only a 'Ring Spanner' to do the job. The whole set can be bought for Rs.350/-, the required size for the tapet nut is size 17.
5. Inside you'll see something like this.
Exhaust Valve

Intake Valve
Picture fefore removing L bracket (Courtesy of CRF230).
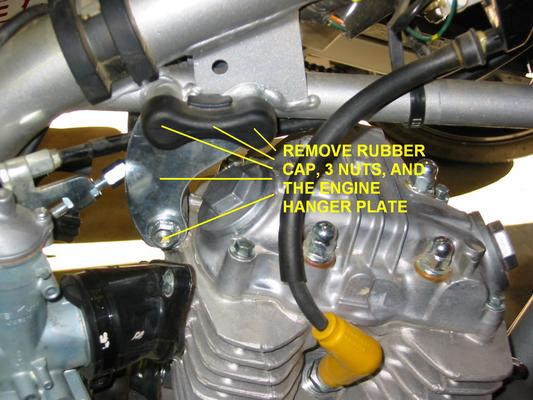
Note - We've removed the 'L' bracket for easy access.

6. Remove the Sparkplug and Remove the Inspection Window Cover.

Now align the line on the left of the 'T' mark with the cut seen at the bottom of the inspection window at compression stroke to bring the piston at TDC, this is done by moving the bike in final gear till you meet compression. To check if you've done it right, inspect the rocker arm's and you'll see that theres abit of play on both intake and exhaust, not a precise methode, but gets the job done.
Here's a pic of the Flywheel taken out of the bike, so you'll get a better idea of how it looks.

7. So now the feeler guage comes to play. Insert it below the bottom end of the tapet screw seen below the rocker arm (not the space between the lock nut and the rocker arm.).
Loosen the lock nut with a size 10 O'Ring spanner and then adjust the tapet adjuster/screw with the special tool (The Rs.50/- one.) with respect to the feeler guage, keeping in mind the 0.10mm free play. Dont worry its not a biggie, here's a pic of the thing taken out i.e including the lock nut.

And heres a pic of the rocker arm without the lock nut and the tapet screw.

8.
Symptoms:
There will be a sewing machine type of noise when you start the bike, which will decrease as the engine gets hotter. Cause when the engines hot, the thingi's expand thus filling the unnecessary space resulting in reduced noise.
Necessities(Before doing the deed.):
1. Pair of Tappet Bolt O'Rings (Rs.12/-).
2. Fevibond Adhesive (Rs.13/-).
3. Hero Honda Special Tappet Tool (Rs.50/-).
4. Modified Feeler Guage (Will get back to the cause of modification later.).
5. Special Retrieval Tool (Made by KB100 & Aneesh@4Ghz).
We had to make this tool cause the
used to hold the blades of the feeler guage got loose and fell into the valve hole. And we went through hell to get it out of there.Procedure:
MAKE SURE THE BIKE's BEEN IDLE FOR AT LEAST 3Hrs.
1. Remove side panels.
2. Remove tank.
3. Remove fairing & Store in a safe place, since its the most fragile part of our bike.
4. Remove both 'Tapet Cover Bolt's' and use only, I repeat use only a 'Ring Spanner' to do the job. The whole set can be bought for Rs.350/-, the required size for the tapet nut is size 17.
5. Inside you'll see something like this.
Exhaust Valve
Intake Valve
Picture fefore removing L bracket (Courtesy of CRF230).
Note - We've removed the 'L' bracket for easy access.
6. Remove the Sparkplug and Remove the Inspection Window Cover.
Now align the line on the left of the 'T' mark with the cut seen at the bottom of the inspection window at compression stroke to bring the piston at TDC, this is done by moving the bike in final gear till you meet compression. To check if you've done it right, inspect the rocker arm's and you'll see that theres abit of play on both intake and exhaust, not a precise methode, but gets the job done.
Here's a pic of the Flywheel taken out of the bike, so you'll get a better idea of how it looks.
7. So now the feeler guage comes to play. Insert it below the bottom end of the tapet screw seen below the rocker arm (not the space between the lock nut and the rocker arm.).
Loosen the lock nut with a size 10 O'Ring spanner and then adjust the tapet adjuster/screw with the special tool (The Rs.50/- one.) with respect to the feeler guage, keeping in mind the 0.10mm free play. Dont worry its not a biggie, here's a pic of the thing taken out i.e including the lock nut.
And heres a pic of the rocker arm without the lock nut and the tapet screw.
8.
9. Now scratch out the old O'Ring and then coat the new O'Ring with a considerable amount of Fevibond and wait till it partially dries to form a rubber coating around it. Then insert it into the tappet cover bolt and put back the both the tappet bolts. And reverse the rest of the steps.
10. Your back in action now, and ready to roll...

RIDE SAFE.
10. Your back in action now, and ready to roll...
RIDE SAFE.


 , but I think a few more snaps would've made it better - I've underlined a couple where it would've helped the starters ..
")


Comment