


 Tweet
Tweet
About four years back, the rust in the silencer pipe of my ZMA near the bends started to surface. It had just started then, later over the years it grew significantly no matter how much I take care to limit its expansion (by that I meant not to drive in watery area as much as possible). I did not like it at all, as it was screwing ZMA's look. I have noticed in many ZMA's (and on many other manufacturer motorcycles too), that this problem was there and nobody was willing to give a damn.
So, my aim was to clear it and repaint it and look good. It can be helpful to someone if that person can spare few hours. After completing it, I can say that it's not that much tedious as it looks, just a little effort.
PRECATIONS: This work must be done in water free environment, little ventilated area.
TOOLS:
1. T Spanners/T Handle wrench. [Sizes: 10, 12 and 14] It can be obtain from the machinery hardware tools shops. These shops are located near the shops which sell the submersible motors, motors for deep wells/bore wells.
2. Open End Spanner/Wrench [Sizes: 08 and 10]. It also can be obtained from the machinery hardware tools shops.

3. Sandpapers. These can be obtained from the wall paint shops. They have many variety and are very less expensive.

4. Spray Colour Can a.k.a. Stove paint. It is very much important that one should buy the paint that is HIGH HEAT RESISTANCE spray colour. I bought it from online retailer Amazon.in for ₹ 385 of colour matt black (400 ml can).

5. Allen key [Size: 4], to remove the golden / silver cover of silencer.
6. Some old newspapers.
PROCEDURE:
NOTE: The picture shown were not taken according to the steps explained in the order below. Many pictures were taken after finishing the paint-job and refitting of the silencer pipe was done. I request to ignore this error of pictures.
STEPS:
I have preferred to use T handle Wrench/ T spanner for easy access where open end spanners are tough to operate in less spaced places..
I. REMOVAL OF ENGINE COWL:
Since the screws on the cowl were not coming out easily and in fear of damaging them, I decided to remove the engine cowl completely. Here are the steps.
1. Loose and Remove the bolts completely shown in the picture using T Spanner (Size:12).

2. Only Loose the yellow circled bolt using Open End Spanner/Wrench (Size:10). Do not remove this bolt completely, it should be loose only that much, so that the curved plate (highlighted in RED) can be suspended freely with the help of the bolt and will not affect the removal of cowl.

3. Here, I had used Open end spanner (Size:10) to loose the bolt. After it gets loosen up, I used T spanner (Size:10) to remove it completely.

4. Same procedure as Step 3.

After these 4 steps the engine cowl comes out easily, one just have to pull it appropriately.
II. REMOVAL OF SILENCER/EXHAUST PIPE:
1. Firstly, Only Loose the bolts shown in yellow circles using T Spanner (Size:10).

2. Same as step 1, Only Loose the bolt for now. Do not remove the bolts completely.

3. Remove the bolt completely using the T Spanner (Size:14).

4. Then, remove the bolt completely above the silencer cover/muffler using T Spanner (Size:14).

5. Now, remove the bolts completely from steps 1 and 2. The Silencer will sit there without any bolts need to hold in its position. Few shaking and hand pushes at the rear end of the silencer can loosen it up and push the silencer from the back to the direction shown, it will come out. Taking someone's help for hand push from the rear of silencer in this step will ease this step.

The silencer will be removed after these steps.
IMPORTANT NOTE: Using a cloth piece, close/cover the exhaust hole in the cylinder head of engine, so that nothing goes inside the cylinder through that exhaust hole.
III. REMOVAL OF CHROME/GOLDEN EXHAUST COVER/MUFFLER:
I was able to remove outer muffler easily using the Open End spanner (Size:8) on the yellow circled nuts shown in the picture.
1. Remove the 5 Allen bolts using Allen key (Size:4). Pull out the rear cover

2. To remove the inner muffler, I had to open the two Allen bolts. I tried to remove the Allen bolts using the Allen Keys (Size: 4).


The Allen nuts were so tight, may be they rusted from inside and jammed up, I broke an Allen key by putting too much pressure. After too many failure attempts, I decided to let the inner muffler be there. I will cover it up with plastic before spray painting.
Need to clean the silencer, so that all the dust gets removed.
After cleaning it looks like as shown in picture. One can see the rusted part along the bends and in some new areas too.

Above picture is brighten to show the rusted portion.
IV. SANDING OF SILENCER/EXHAUST:
Before buying the sandpapers, there are two thing to remember:
1. Lower the sandpaper number, Rougher the grits will be.
2. Higher the sandpaper number, Smoother the grits will be.
This means lower number sandpapers are best suited for removing the paint from the surface with lesser efforts. And higher number sandpapers are best suited for polishing/smoothing the surface that was made uneven by lower number sandpapers.
I used sandpaper number 100 to remove paint from silencer. Then, sandpaper number 150 to smother the surface. Then, I used sandpaper number 320 to smooth even more. And finally, I used sandpaper number 600 to finalize the super smoothing the surface.
One more thing, Sanding must be done in one direction, either vertical or horizontal for proper sanding from the surface. I chose to vertical method as the pipe was cylindrical and with this method I used lesser effort to remove the paint from more area. In corners or closed places, one can select any method. This is for proper finishing on the pipe.

1. Place a newspaper below the silencer, so that it the place surrounding the sanding are does not get dirty. Put cloth inside the Exhaust inlet of exhaust pipe.
2. Cut a small piece from the leaflet of sandpaper. Start Rubbing that piece of sandpaper on the metal surface by decided method and keep rubbing until the bare metal past the rust is seen. Do not just rub on the rusted part cover area around the rusted part. Keep even pressure on the sand paper for both rusted and non rusted part as one would want an even surface.

3. The scratches vertical on the metal surface can be seen.

This how the exhaust pipe looks after all sanding and polishing.

IMPORTANT NOTE: After polishing, care must be taken that, water does not come in contact with the polished surface, as it will lead possibility of rust formation again.
V. SPRAY PANTING:
Since I was not able to remove the inner muffler, I covered it with the plastic bags and stick it with duct tapes. (This is the first time I am using the spray paint, being cautious I used papers on walls. But it was not necessary to use it if we control the flow of spray.)


Before spraying the paint to polished surface, it is better to use Primer coat as it provides proper base to the paint. But I decided to skip this step as I did not find High Temperature Primer coat at that time.
Now for spraying the paint, I would suggest to look at this video as it provides basic idea regarding getting a even coating of spray paint.
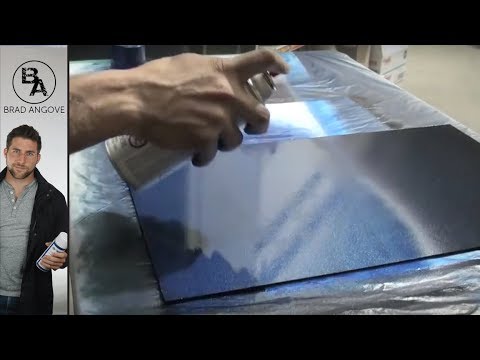
One simple way is to use multiple light coats than single heavy coat.
I did a single coat three times. Time between every spray coats was 30 minutes. Single coat of spray takes about five minutes to dry. This is the silencer after 3 coats of spray painting.

It is not necessary to hang the Silencer like I did, I did it for completer access to everyplace. It can be done by placing it on few newspapers on ground.
Just to show how rusting has affected the metal surface, surface above line was affected by rust than polished surface below the line.

Let it dry for about an hour, and then fit it again as removed from the ZMA.
Follow these steps to fit it again on the bike.
1. SECTION III : Step 2 > Step 1.
2. SECTION II : Step 5 > Step 4 > Step 3 > Step 2 > Step1.
3. SECTION I : Step 4 > Step 3 > Step 2 > Step1.
After fitting the silencer on ZMA looks like this.

FOLLOW UP NOTE: I will update the condition of the paint after few months, till then it will be tested.
PS: This is my first post in DIY section, I tried it to be as simple as possible. Some pictures got rotated here, I took those in portrait mode here they are shown in landscape mode.
So, my aim was to clear it and repaint it and look good. It can be helpful to someone if that person can spare few hours. After completing it, I can say that it's not that much tedious as it looks, just a little effort.
PRECATIONS: This work must be done in water free environment, little ventilated area.
TOOLS:
1. T Spanners/T Handle wrench. [Sizes: 10, 12 and 14] It can be obtain from the machinery hardware tools shops. These shops are located near the shops which sell the submersible motors, motors for deep wells/bore wells.
2. Open End Spanner/Wrench [Sizes: 08 and 10]. It also can be obtained from the machinery hardware tools shops.
3. Sandpapers. These can be obtained from the wall paint shops. They have many variety and are very less expensive.
4. Spray Colour Can a.k.a. Stove paint. It is very much important that one should buy the paint that is HIGH HEAT RESISTANCE spray colour. I bought it from online retailer Amazon.in for ₹ 385 of colour matt black (400 ml can).
5. Allen key [Size: 4], to remove the golden / silver cover of silencer.
6. Some old newspapers.
PROCEDURE:
NOTE: The picture shown were not taken according to the steps explained in the order below. Many pictures were taken after finishing the paint-job and refitting of the silencer pipe was done. I request to ignore this error of pictures.
STEPS:
I have preferred to use T handle Wrench/ T spanner for easy access where open end spanners are tough to operate in less spaced places..
I. REMOVAL OF ENGINE COWL:
Since the screws on the cowl were not coming out easily and in fear of damaging them, I decided to remove the engine cowl completely. Here are the steps.
1. Loose and Remove the bolts completely shown in the picture using T Spanner (Size:12).
2. Only Loose the yellow circled bolt using Open End Spanner/Wrench (Size:10). Do not remove this bolt completely, it should be loose only that much, so that the curved plate (highlighted in RED) can be suspended freely with the help of the bolt and will not affect the removal of cowl.
3. Here, I had used Open end spanner (Size:10) to loose the bolt. After it gets loosen up, I used T spanner (Size:10) to remove it completely.
4. Same procedure as Step 3.
After these 4 steps the engine cowl comes out easily, one just have to pull it appropriately.
II. REMOVAL OF SILENCER/EXHAUST PIPE:
1. Firstly, Only Loose the bolts shown in yellow circles using T Spanner (Size:10).
2. Same as step 1, Only Loose the bolt for now. Do not remove the bolts completely.
3. Remove the bolt completely using the T Spanner (Size:14).
4. Then, remove the bolt completely above the silencer cover/muffler using T Spanner (Size:14).
5. Now, remove the bolts completely from steps 1 and 2. The Silencer will sit there without any bolts need to hold in its position. Few shaking and hand pushes at the rear end of the silencer can loosen it up and push the silencer from the back to the direction shown, it will come out. Taking someone's help for hand push from the rear of silencer in this step will ease this step.
The silencer will be removed after these steps.
IMPORTANT NOTE: Using a cloth piece, close/cover the exhaust hole in the cylinder head of engine, so that nothing goes inside the cylinder through that exhaust hole.
III. REMOVAL OF CHROME/GOLDEN EXHAUST COVER/MUFFLER:
I was able to remove outer muffler easily using the Open End spanner (Size:8) on the yellow circled nuts shown in the picture.
1. Remove the 5 Allen bolts using Allen key (Size:4). Pull out the rear cover
2. To remove the inner muffler, I had to open the two Allen bolts. I tried to remove the Allen bolts using the Allen Keys (Size: 4).
The Allen nuts were so tight, may be they rusted from inside and jammed up, I broke an Allen key by putting too much pressure. After too many failure attempts, I decided to let the inner muffler be there. I will cover it up with plastic before spray painting.
Need to clean the silencer, so that all the dust gets removed.
After cleaning it looks like as shown in picture. One can see the rusted part along the bends and in some new areas too.
Above picture is brighten to show the rusted portion.
IV. SANDING OF SILENCER/EXHAUST:
Before buying the sandpapers, there are two thing to remember:
1. Lower the sandpaper number, Rougher the grits will be.
2. Higher the sandpaper number, Smoother the grits will be.
This means lower number sandpapers are best suited for removing the paint from the surface with lesser efforts. And higher number sandpapers are best suited for polishing/smoothing the surface that was made uneven by lower number sandpapers.
I used sandpaper number 100 to remove paint from silencer. Then, sandpaper number 150 to smother the surface. Then, I used sandpaper number 320 to smooth even more. And finally, I used sandpaper number 600 to finalize the super smoothing the surface.
One more thing, Sanding must be done in one direction, either vertical or horizontal for proper sanding from the surface. I chose to vertical method as the pipe was cylindrical and with this method I used lesser effort to remove the paint from more area. In corners or closed places, one can select any method. This is for proper finishing on the pipe.
1. Place a newspaper below the silencer, so that it the place surrounding the sanding are does not get dirty. Put cloth inside the Exhaust inlet of exhaust pipe.
2. Cut a small piece from the leaflet of sandpaper. Start Rubbing that piece of sandpaper on the metal surface by decided method and keep rubbing until the bare metal past the rust is seen. Do not just rub on the rusted part cover area around the rusted part. Keep even pressure on the sand paper for both rusted and non rusted part as one would want an even surface.
3. The scratches vertical on the metal surface can be seen.
This how the exhaust pipe looks after all sanding and polishing.
IMPORTANT NOTE: After polishing, care must be taken that, water does not come in contact with the polished surface, as it will lead possibility of rust formation again.
V. SPRAY PANTING:
Since I was not able to remove the inner muffler, I covered it with the plastic bags and stick it with duct tapes. (This is the first time I am using the spray paint, being cautious I used papers on walls. But it was not necessary to use it if we control the flow of spray.)
Before spraying the paint to polished surface, it is better to use Primer coat as it provides proper base to the paint. But I decided to skip this step as I did not find High Temperature Primer coat at that time.
Now for spraying the paint, I would suggest to look at this video as it provides basic idea regarding getting a even coating of spray paint.
One simple way is to use multiple light coats than single heavy coat.
I did a single coat three times. Time between every spray coats was 30 minutes. Single coat of spray takes about five minutes to dry. This is the silencer after 3 coats of spray painting.
It is not necessary to hang the Silencer like I did, I did it for completer access to everyplace. It can be done by placing it on few newspapers on ground.
Just to show how rusting has affected the metal surface, surface above line was affected by rust than polished surface below the line.
Let it dry for about an hour, and then fit it again as removed from the ZMA.
Follow these steps to fit it again on the bike.
1. SECTION III : Step 2 > Step 1.
2. SECTION II : Step 5 > Step 4 > Step 3 > Step 2 > Step1.
3. SECTION I : Step 4 > Step 3 > Step 2 > Step1.
After fitting the silencer on ZMA looks like this.
FOLLOW UP NOTE: I will update the condition of the paint after few months, till then it will be tested.
PS: This is my first post in DIY section, I tried it to be as simple as possible. Some pictures got rotated here, I took those in portrait mode here they are shown in landscape mode.


Comment