Since '02 xBhp is different things to different people. From a close knit national community of bikers to India's only motorcycling lifestyle magazine and a place to make like-minded biker friends. Join us

Castrol Power 1

Always wear a helmet.

Our Partner

Announcement

Collapse
No announcement yet.

Project Build - Shogun piston modding an RX00 block / RX100 to RX110

Collapse
X
 
  • Filter
  • Time
  • Show
Clear All
new posts

  • #46
    Re: Project Build - Shogun piston modding an RX00 block / RX100 to RX110

    Nice Build. Love the shades.... Ride safe

    Happy & Safe Riding to All

    Comment


    • #47
      Re: Project Build - Shogun piston modding an RX00 block / RX100 to RX110

      Hello, I’m FATALITY-X’s brother. Recently we did a full bottom end rebuilt on our RX100, and here’s how that happened.

      After a good 20,000-22,000kms since the shogun piston mod, we encountered a major engine failure. It was when I tried to kick start the engine cold, the kick lever suddenly got stuck at a point before it hit the stopper. Something was clearly wrong; I tried pushing the kick lever gently and noticed that the operation was very rough. Initially I thought the kick start assembly might have disoriented, but removing the right side case and close inspection showed nothing wrong with the kick start, also the clutch, primary gear and everything else seems just fine. So it means something went wrong inside the engine or the crankcase. Next step was to remove the cylinder head and get a good look at the piston and cylinder walls, but that too was just fine, no scuffing marks, carbon deposits were minimum and the piston moves inside the cylinder smoothly till the point where the kicker decides not to go any further. So without any doubts, I concluded it is the crank. Brother said it should be due to failed crank bearings. It could have been due to the lighter shogun pistons which abrupts the primary/secondary balancing or it could be due to my occasional sudden downshifts which makes it rev harder, both of which increases the load on the bearings, Or it simply may be the shitty bearings that the old mechanic put in for the last bottom end rebuild that we couldn’t know, whatever the reasons be, this meant splitting the crank case and it was a nightmare.
      So what will we do now?, should we take the bike to a workshop or go with a DIY?. DIY it was, there isn’t any mechanic near our town whom we trusted anyway, and also it was an opportunity because we’ve never done this before.
      But before I start the DIY, this particular project requires its tools. Of course we had our sets of screwdrivers, wrenches, pliers, ratchet and all those basic stuff you can think of. But I needed special tools. So, here’s list of tools that’s recommended for this job.

      Special Tools for crankcase splitting:


      1)
      Impact Screw Driver/Wrench: Don’t even think about loosening those 13 screws which holds the gearbox and crankcase with the conventional screw driver, you’ll only end up striping its head. I tried searching/contacting some of the big hardware shops and all they had was the electric impact wrenches which was not the one I wanted. I was looking for the manual hand held one, which is also the cheapest. After a couple of days went past a local hardware shop in my town and found just the tool I was looking for.

      ^This particular one also supports 1/2 inch sockets, which is helpful in tighting/loosing clutch boss and primary drive nuts.

      2)
      Flywheel Puller: Once the flywheel nut is off. The flywheel should be pretty seized to the crankshaft after a lot of heat cycles. So without this tool I don’t think there is any other way to pull it out. There are a variety of pullers that we can find on ebay, but luckily for me I was able to borrow it from a workshop through a friend. Once you have the tool, It only takes like a second to pull the flywheel off (note that it is a left hand thread). And the good thing is, you don’t require it for installation.

      3)
      Clutch Holding Tool: It’s a simple tool, and I made this one. All you need is a used friction plate and a steel rod of at least 150mm length. Weld those two together and you have the right tool for the job.


      4)
      Crankcase Puller/Separating Tool: We can find lots of adjustable type pullers over the internet which can serve this purpose for most of the motorcycles. But if you have the time and patience you can build one as I did. Here as base plate I used a junk leaf spring of a truck. The damn thing is so hard that I had to take it to a lathe shop to drill those three 8mm holes. Those long bolts you can see is the head bolt of Yamaha Crux. It should be at least 100mm long, this one was 200mm and I had to use nuts and spacers to get to the length I wanted.


      5)
      Flywheel Holding Tool: The service manual recommends this. But I was able to lock the flywheel with a T-spanner by loading it to the ground with one end inserted into the holes provided in the flywheel and then loosen the nut. I know it’s not the right way, so care should be taken not to damage the stators inside the flywheel.

      6)RX100
      Workshop Manual: I know this doesn’t fall under the category of special tools. But don’t attempt to do all these without the manual unless you are an experienced mechanic. It contains almost all the information you need to know about repair and maintenance of the bike.
      Heres a link to the pdf: http://www.mediafire.com/download/vcon9950gdv92o7/RX_100_workshop_manual.pdf

      Also, pardon me for the limited no. of pics, I actually planned do a detailed write up, but unfortunately the memory card of my phone got damaged and lost most of the photos.

      Here are some available pics after the crankcase separation.


      There were a lot of sludge deposits inside the gearbox. Gears, shift cam, shift forks were all in good shape.


      As expected the crankshaft bearings has given up. This particular one is from the right side of crankshaft(either side of the same bearing shown in picture). The ball cage of this one was completely destroyed. The left side bearing has not taken much beating though.

      Things I replaced/changes made:

      # Replaced all bearings (crankshaft bearings, mainshaft ball bearing and needle bearing, countershaft needle bearing) and seals, except the ball bearing on the countershaft.

      # Replaced Clutch boss, Thrust plate and Clutch housing*

      # Replaced Shift shaft

      # Replaced Connecting rod and big end bearing*

      # Ported intake windows on the shogun piston for better crankcase pressurizing. I made 2 rectangular windows with a barrier separating them which aligns with the barrier in the intake ports on the block. This was to maintain the structural rigidity of the piston and to prevent it from rocking(side to side movement of piston).(I’m sorry I lost the damn picture). I did this by first drawing the dimensions I needed on the piston with a marker and then drilling 2 holes for each windows with a hand drill to get something to start with. Then I hand filed my way through, to the actual dimensions I needed. It took about 2 hours for completion.

      # Reworked the Head gasket and decreased compression. The bike had some issue at high rpms, it used to make some pinning noise (which meant detonation) and also used to starve for fuel while at constant WOT and peak revs. After close inspection we found out that the head gasket was protruding to the inside of the cylinder unevenly. This should be creating some hot spots (high temp zones) inside the cylinder and may have been causing detonation. So reworked it with a ball grinding stone to match the bore. Also we decreased the compression for safety from detonation by adding an extra base gasket below the cylinder block.

      *Replacing Big End bearing,Connecting rod and Reworking Clutch Housing were done in a lathe shop.

      Riding experience:

      I was so happy that the bike is up and running after 3 months. The first thing to note was the decreased bottom end torque. Make sense due to the decreased compression. Single rides are not an issue but I had to slip the clutch to prevent the engine from stalling with a pillion aboard. But how will this reflect at high rpms?, and there was the surprise! The bike literally comes alive after 60kph in 4th gear and pulls to 100kph with ease. The top speed was 120kph on the stock speedometer single ride (me being at 55kg, 168cms). With a 65-70kg pillion I was able to clock 110kph. Also the fuel starvation issue has completely vanished, should be due to the intake port windows on the piston which increased the charge flow. Initially we thought starvation was an issue regarding the limited fuel flow from the petcock and was thinking about using a ported one. Now that’s a bonus.
      I did a long trip soon after the rebuilt from Chalakudy-Wayanad with a 65-70kg pillion along with a couple of other friends. Total distance covered was 621kms. The average speed was in 60-70kph range and went past 100kph couple of times. The bike gave me no issue throughout the trip except for a blown up head lights. The average fuel efficiency was 28kmpl during the trip. Back home I checked it again a couple of times in mixed riding conditions and got it between 30-32kmpl.


      ^Pic from the wayanad trip along with my friend as pillion. Location: Sulathan Bethery.
      Last edited by Vivek 94; 01-08-2015, 09:27 PM.

      Comment


      • #48
        Re: Project Build - Shogun piston modding an RX00 block / RX100 to RX110

        Originally posted by Vivek 94 View Post

        Special Tools for crankcase splitting:


        1)
        Impact Screw Driver/Wrench:
        2)
        Flywheel Puller:
        3)
        Clutch Holding Tool:
        4)
        Crankcase Puller/Separating Tool: We can find lots of adjustable type pullers over the internet which can serve this purpose for most of the motorcycles. But if you have the time and patience you can build one as I did. Here as base plate I used a junk leaf spring of a truck. The damn thing is so hard that I had to take it to a lathe shop to drill those three 8mm holes. Those long bolts you can see is the head bolt of Yamaha Crux. It should be at least 100mm long, this one was 200mm and I had to use nuts and spacers to get to the length I wanted.


        5)
        Flywheel Holding Tool:

        6)RX100
        Workshop Manual: http://www.mediafire.com/download/vcon9950gdv92o7/RX_100_workshop_manual.pdf

        Also, pardon me for the limited no. of pics, I actually planned do a detailed write up, but unfortunately the memory card of my phone got damaged and lost most of the photos.

        Here are some available pics after the crankcase separation.


        There were a lot of sludge deposits inside the gearbox. Gears, shift cam, shift forks were all in good shape.


        As expected the crankshaft bearings has given up. This particular one is from the right side of crankshaft(either side of the same bearing shown in picture). The ball cage of this one was completely destroyed. The left side bearing has not taken much beating though.

        Things I replaced/changes made:

        # Replaced all bearings (crankshaft bearings, mainshaft ball bearing and needle bearing, countershaft needle bearing) and seals, except the ball bearing on the countershaft.

        # Replaced Clutch boss, Thrust plate and Clutch housing*

        # Replaced Shift shaft

        # Replaced Connecting rod and big end bearing*

        # Ported intake windows on the shogun piston for better crankcase pressurizing. I made 2 rectangular windows with a barrier separating them which aligns with the barrier in the intake ports on the block. This was to maintain the structural rigidity of the piston and to prevent it from rocking(side to side movement of piston). I did this by first drawing the dimensions I needed on the piston with a marker and then drilling 2 holes for each windows with a hand drill to get something to start with. Then I hand filed my way through, to the actual dimensions I needed. It took about 2 hours for completion.

        # Reworked the Head gasket and decreased compression. The bike had some issue at high rpms, it used to make some pinning noise (which meant detonation) and also used to starve for fuel while at constant WOT and peak revs. After close inspection we found out that the head gasket was protruding to the inside of the cylinder unevenly. This should be creating some hot spots (high temp zones) inside the cylinder and may have been causing detonation. So reworked it with a ball grinding stone to match the bore. Also we decreased the compression for safety from detonation by adding an extra base gasket below the cylinder block.

        *Replacing Big End bearing,Connecting rod and Reworking Clutch Housing were done in a lathe shop.

        Riding experience:

        I was so happy that the bike is up and running after 3 months. The first thing to note was the decreased bottom end torque. Make sense due to the decreased compression. Single rides are not an issue but I had to slip the clutch to prevent the engine from stalling with a pillion aboard. But how will this reflect at high rpms?, and there was the surprise! The bike literally comes alive after 60kph in 4th

        how did you install the crank into the lhs crankcase

        PS: excellent job though
        Kawasaki KB100/enduro/125 substitute parts list http://www.xbhp.com/talkies/508615-post105.html

        Comment


        • #49
          Re: Project Build - Shogun piston modding an RX00 block / RX100 to RX110

          Originally posted by kb100 View Post
          how did you install the crank into the lhs crankcase

          PS: excellent job though
          Thank you for asking, I forgot to mention that.
          Initially I thought I might require a Crank Installer Tool and was thinking about making one. But instead this is how it worked for me.
          I packed the crank in a plastic cover and kept it in the fridge freezer overnight at the lowest temp possible. And then all it needed was a gentle push with my hand and the crank fell right into the LHS bearing previously installed on the case with a \\\'dub\\\' sound. checked weather it had any side to side play and there wasn\\\'t any. After watching so many \\\'How to\\\' videos on youtube, I never thought it would be that easy. Dont know weather it was the right way, but it worked for me.
          Last edited by Vivek 94; 01-09-2015, 09:49 PM.

          Comment


          • #50
            Re: Project Build - Shogun piston modding an RX100 block / RX100 to RX110

            i need a block and piston set for my rx 100... Any idea from where i could get it?? Im from Mumbai
            Four wheels move the body. Two wheels move the soul.......

            Comment


            • #51
              Originally posted by FATAL1TY - X View Post
              How it all began - It was in my mind for 2 years. Didnt got the spare time and budget to do it until now. I home ported the spare block i had months ago for this. For starters its called a bigbore mod. But for the enthusiast who want the long answer, its called shogun piston modding a RX100 block. the shogun piston is ligter but larger(52.50mm vs the stock 50.00mm). but the block needs to be heavily modified to accommodate the (about)10 mm shorter shogun piston. Compression height is vastly off. All the work except for reboring and cylinder block milling is done by me.

              I'm new to the tuning front. But i always felt tuning is more than just a performance air filter and an iridium spark plug. so sourced a bored out block from a friend for free, that is 3 years ago. everything was preplanned except for some vital data.
              1) I had no idea about the specs of a stock shogun piston(asked for help here, and as usual, no one replied!).
              2) I don't know the difference in specification b/w the Shogun engine and RX100 engine.
              3) I had no previous experience. (also called a noob)

              so, putting my engine at stake, i decided to work on it one day. Stripped the whole engine in about 1/2 hours and started to examine the parts for wear. I wasnt a slow rider. i never properly runs in an engine even though i know the risks. so was expecting some mild seizure marks on the piston.

              All parts removed and ready to examine.


              Small end had a little play. so concluded that piston pin and/or bearing is shot. Big end was fine as i did my recent bottom end rebuild a year or so ago.
              Now, the surprise was that the piston didnt showed any abnormalities. It was of the brand Goetze. This brand of piston is not a favorite among enthusiasts. but it handled the power from a polished and piped block. Looks like Indian brands are getting better!


              Exhaust side. Some normal scoring marks.


              Intake side. it was also looking good.


              Piston dome. Its a first oversize piston.


              Later that day, i went out to look for the shogun piston. after searching for a while, i found a 52.75mm(1st oversize) SAM piston. Now before you all bash me for not going for an ART piston, let me remind you that in Kerala(not just Kerala, almost in every part of india), not much people are aware of performance parts or tuning. so availability sucks. And also, i didn't knew how the build will turn out to be. so didn't wanted to spent a lot on performance parts and later blow it all up. Piston kit included piston, rings, piston pin and circlips.

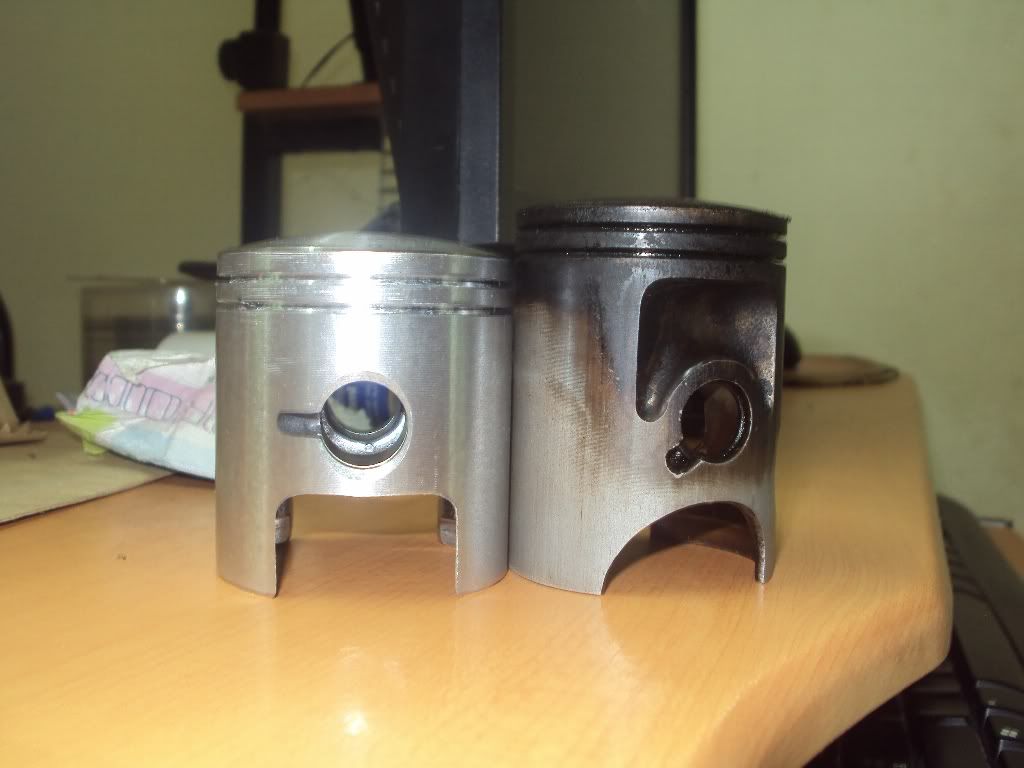
              I went home, and it was measuring time. the first thing you'll notice is how light the shogun piston is comparing the 100's. placing them both on a level surface brought out new challenges for me. Shogun piston deck height is about 6-7mm shorter than the 100. 100's stock piston came with ported skirts to increase intake duration but shogun piston is not ported. The "feel good" part was when i found out that the skirt of both the pistons where about the same in length(Shogun piston had just about an mm shorter skirt than the RX), Shogun and RX piston has a same diameter piston pin and that shogun piston has a taller dome.


              After getting those crucial numbers i needed for this build to happen, i decided to mill 7mm from the base of the block and an mm from the top of the block. That will even out the piston deck height to cylinder height when at TDC, gives me better compression and also increased intake duration. Went to the lathe shop, and after lecturing the lathe guy in every possible way i could on how important "Precision" is crucial in this job, he said okay. He told me to drop by 2 days later. And so I went home.

              Later that day i decided to map the stock cylinder block. after a lot of time and paper sheets away i got it just about right. Now, you cant do much with a divider and a scale. can we?


              The next problem i came across was with the small end bearing. Shogun piston had wider pin supports than that of the 100's. So when using the stock bearing along with the shogun piston caused excessive play b/w the pin supports and bearing, which can result in bearing failure as now bearing is running around instead of staying in a place! Refer the below pic.


              So again, i was puzzled with questions. After a while, i decided to go for Shogun's small end bearing. It also posed a slight problem. As the shogun piston small end bearing is longer, it will protrude out of the small end of the RX conrod 2-3 mm. Decided that it is much better than a bearing which runs around in its place. The Shogun bearing on the left in the below pic is a new bearing . it cost only 50Rs. And out of the box it was rusted and after a while handling it for measuring a roller came off. I guess i'm contradicting myself, but some Indians quality still suck!


              So, decided to look for an original TVS small end bearing. after searching for a while i found one. Now, that was quality. the roller supports where made so that it will lock the rollers in their place. It was also machined much better and it also cost 100+rs.


              The next difference is b/w the piston rings. Shogun uses thinner rings in comparison to the RX100 rings. in the below pic it is not very evident, but in person it is.


              After 2 days, i went to the lathe shop to get my "Gunned" block back. at first inspection i thought he did a great job. machining looked fine, he chamfered the sleeve. everything looked fine except for 2 new ports opening up on the intake side of the block and a slight difference in thickness b/w the left and right side mating surface of the block. i told him to clean the mating surface up. he did that in a jiffy and i left home with my block. Now, what the hell am i going to do with the "New" ports? that was in my mind.


              After placing the block on the bottom end i decided that the "New" intake ports wont be a problem after fixing the cylinder. the problem was with the four fastening holes. After all that machining it had became too thin. Too much tightening torque and i will end up breaking it.

              Here is the original block on the left and "Gunned" block on the right.


              good old days ,
              Kawasaki KB100/enduro/125 substitute parts list http://www.xbhp.com/talkies/508615-post105.html

              Comment

              Working...
              X