


 Tweet
Tweet
Brake pad replacing/brake bleeding:
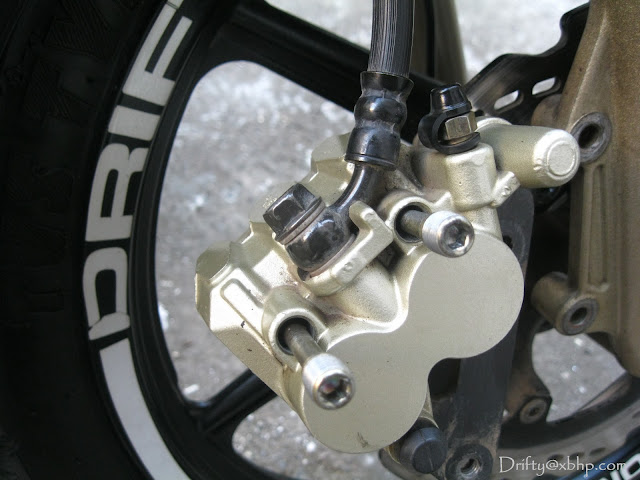
Before you start, make sure you have everything you need to complete the job.Second, have a look over the bike's brakes and see what you'll need to remove the calipers and the pads themselves.
Tools needed:
1)5mm allen key
2)12mm ring spanner
3)rag
4)a flat head screwdriver
5)sand paper
Procedure:

Step 1:
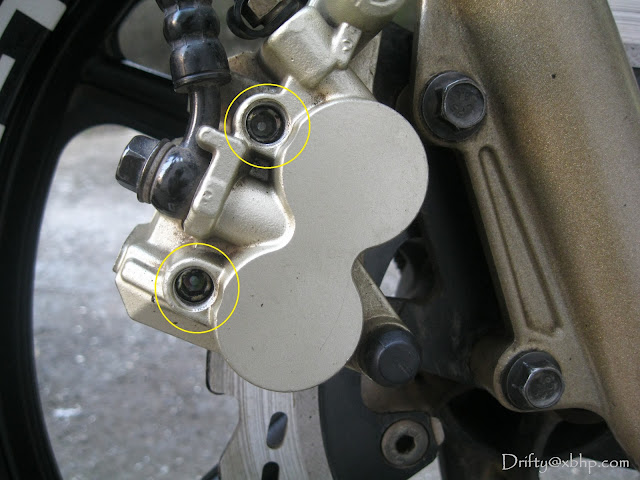
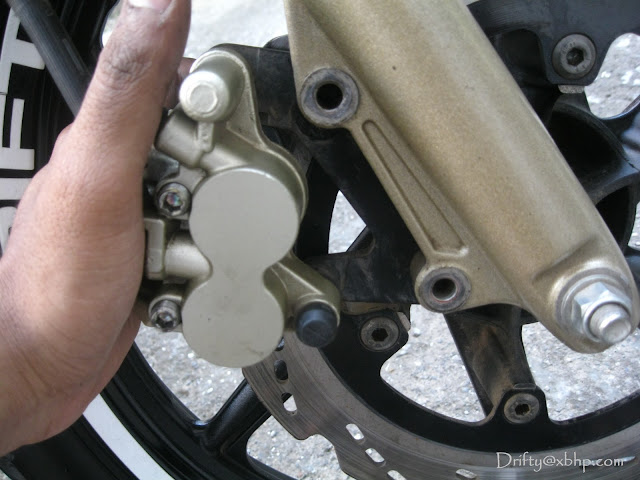
First,remove the caps with a flat head screw driver as shown in the pic.

Step 2:
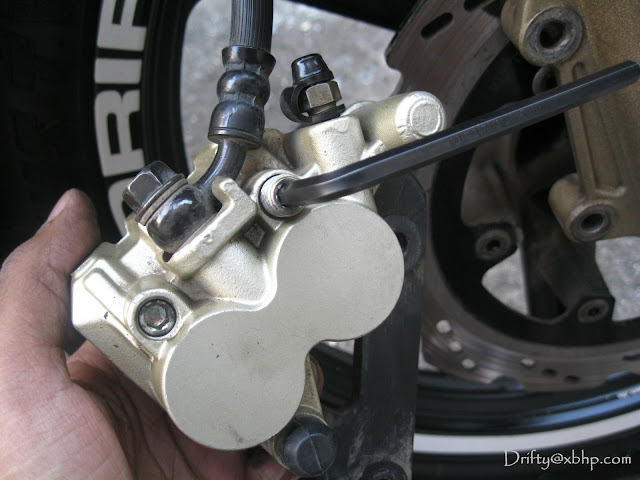
Then loosen the hex headed bolts with the help of a 5mm allen key,it will not be easy to rotate it,too much force is needed hence it will be more easier if you have 5mm hex bits with a ratchet.
After that,wait,don't pull these bolts after loosening them.


Step 3:
Now with the 12mm ring spanner,remove the caliper mounting bolts bolts that hold the caliper with the front fork.Pull out the caliper assembly slowly and remove the hex headed bolts,the brake pads will come out.It's important not to leave the caliper hanging by its brake hoses,so tie it with some cord.


Step 4:
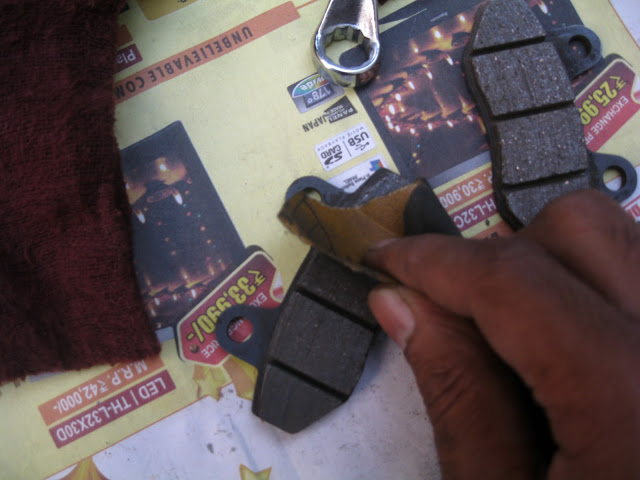
Rub the sand paper on the surface of the brake pads lightly without applying too much pressure.Make sure you rub the paper in only direction.Do not use circular motion or it will smoothen the surface and reduce braking efficiency!


Step 5:
Clean the caliper assembly and piston with soap water or better with a brake cleaner.Now push back the piston inwards to its original position,it can be done with fingers and thumbs and a firm squeeze.If its not possible then place any old pad in between and with a nose plier try to push the piston in.Do this very carefully!

Step 6:
Replace the brake pads in their original position and put the hex bolts back at their place.

Step 7:
Put the caliper assembly back on the front fork and replace the mounting bolts.Check if the brake pads are properly aligned on both sides of the rotor/disc plate.Tighten the hex headed bolts.It's best to tighten the hex bolt once the caliper has been remounted to the fork leg.

Step 8:
Press the brake lever few times so that the pressure builds up!


CAUTION:Never attempt to engage the front brakes,when the pads are removed.
TIPS:
1)It's much easier to do while the calipers are firmly attached to the fork legs hence the hex bolts should be made loose and then remove the caliper mounting bolts.
2)You can apply a dab of grease on the back of the brake pads so that the squeaking noise can be eliminated but be careful not to get the grease on the disc side of the pads!
3)You can apply brake fluid on the pistons for smoother operation.
4)Use only DOT 3 or DOT 4 brake fluid from a sealed container from recommended makes.
5)Do not apply mineral oil for cleaning any brake parts. Use only brake fluid for cleaning the seals.
6)Do not apply mineral based grease on bore, pistons and seals of master cylinder and caliper. Apply only recommended assembly fluid.
7)Do not use cotton cloth to wipe cylinder bore, fibres of cloth will remain in cylinder bore surface.
8)Ensure dust free condition during assembly.
9)Do not polish friction disc with sand paper,as hard particles deposited in the lining may damage steel disc.
10)While filling the reservoir after bleeding, ensure that drops or splashes do not remain on the painted surface or plastic surface, since brake fluid is corrosive.
A word of warning: as with all home maintenance - and especially with something as critical to your safety as brakes - don't attempt the job unless you have got all the right tools to hand and you are confident enough to see it through!
Before you start, make sure you have everything you need to complete the job.Second, have a look over the bike's brakes and see what you'll need to remove the calipers and the pads themselves.
Tools needed:
1)5mm allen key
2)12mm ring spanner
3)rag
4)a flat head screwdriver
5)sand paper
Procedure:
Step 1:
First,remove the caps with a flat head screw driver as shown in the pic.
Step 2:
Then loosen the hex headed bolts with the help of a 5mm allen key,it will not be easy to rotate it,too much force is needed hence it will be more easier if you have 5mm hex bits with a ratchet.
After that,wait,don't pull these bolts after loosening them.
Step 3:
Now with the 12mm ring spanner,remove the caliper mounting bolts bolts that hold the caliper with the front fork.Pull out the caliper assembly slowly and remove the hex headed bolts,the brake pads will come out.It's important not to leave the caliper hanging by its brake hoses,so tie it with some cord.
Step 4:
Rub the sand paper on the surface of the brake pads lightly without applying too much pressure.Make sure you rub the paper in only direction.Do not use circular motion or it will smoothen the surface and reduce braking efficiency!
Step 5:
Clean the caliper assembly and piston with soap water or better with a brake cleaner.Now push back the piston inwards to its original position,it can be done with fingers and thumbs and a firm squeeze.If its not possible then place any old pad in between and with a nose plier try to push the piston in.Do this very carefully!
Step 6:
Replace the brake pads in their original position and put the hex bolts back at their place.
Step 7:
Put the caliper assembly back on the front fork and replace the mounting bolts.Check if the brake pads are properly aligned on both sides of the rotor/disc plate.Tighten the hex headed bolts.It's best to tighten the hex bolt once the caliper has been remounted to the fork leg.
Step 8:
Press the brake lever few times so that the pressure builds up!
CAUTION:Never attempt to engage the front brakes,when the pads are removed.
TIPS:
1)It's much easier to do while the calipers are firmly attached to the fork legs hence the hex bolts should be made loose and then remove the caliper mounting bolts.
2)You can apply a dab of grease on the back of the brake pads so that the squeaking noise can be eliminated but be careful not to get the grease on the disc side of the pads!
3)You can apply brake fluid on the pistons for smoother operation.
4)Use only DOT 3 or DOT 4 brake fluid from a sealed container from recommended makes.
5)Do not apply mineral oil for cleaning any brake parts. Use only brake fluid for cleaning the seals.
6)Do not apply mineral based grease on bore, pistons and seals of master cylinder and caliper. Apply only recommended assembly fluid.
7)Do not use cotton cloth to wipe cylinder bore, fibres of cloth will remain in cylinder bore surface.
8)Ensure dust free condition during assembly.
9)Do not polish friction disc with sand paper,as hard particles deposited in the lining may damage steel disc.
10)While filling the reservoir after bleeding, ensure that drops or splashes do not remain on the painted surface or plastic surface, since brake fluid is corrosive.
A word of warning: as with all home maintenance - and especially with something as critical to your safety as brakes - don't attempt the job unless you have got all the right tools to hand and you are confident enough to see it through!


 ) but there is a special brake grease (thanks nox) which should be used on the seals to allow the pistons to slide in properly.


Comment