Since '02 xBhp is different things to different people. From a close knit national community of bikers to India's only motorcycling lifestyle magazine and a place to make like-minded biker friends. Join us

Castrol Power 1

Check engine oil level before every ride.

Our Partner

Announcement

Collapse
No announcement yet.

Valve clearance setting-RTR180

Collapse
X
 
  • Filter
  • Time
  • Show
Clear All
new posts

  • #16
    @Drifty : Superb DIY! Thanks a million!!
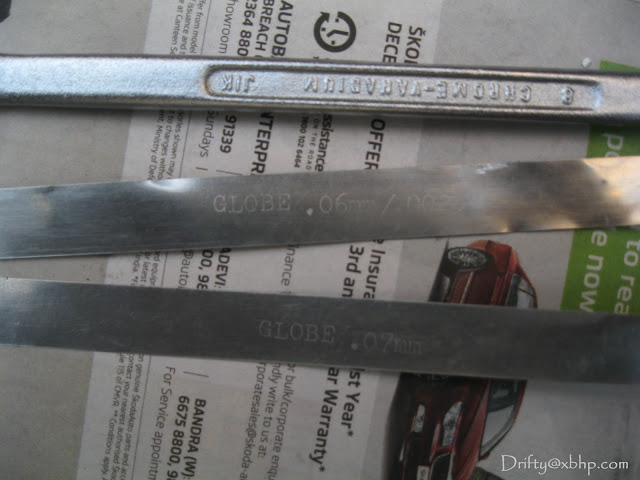
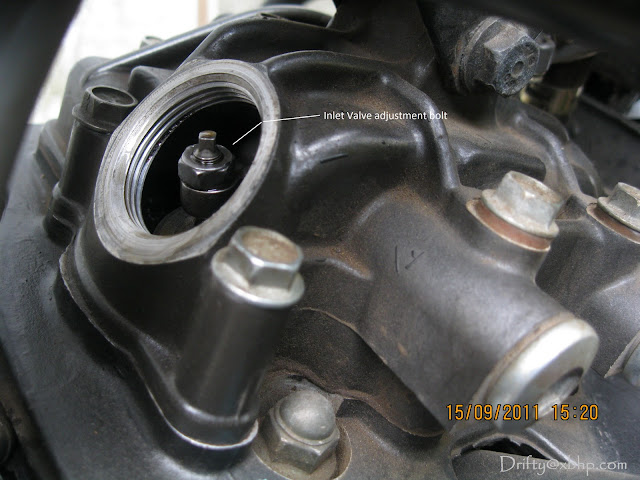
    I did it today morning along with my brother's help when the bike was fully cold. The rattle sound has reduced a lot. The inlet clearance was wrong, almost 0.08mm! I set it correctly.

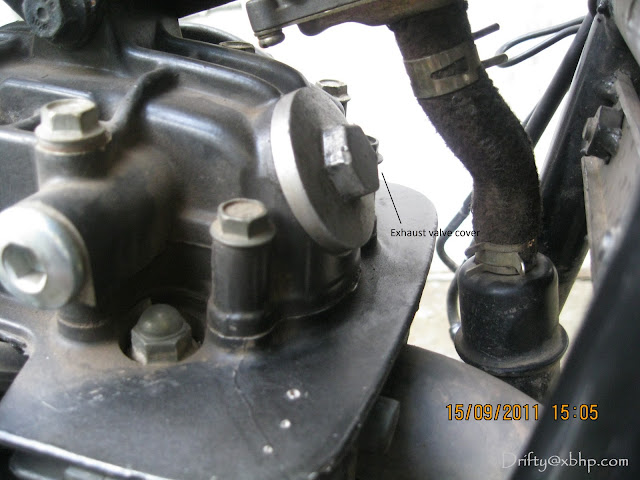
    One thing I would like to mention is your pics make it seem like there is lot of space around the inlet and exhaust port but actually there is very little . Had a hard time adjusting with forceps and spanner. Another mistake was I assumed I had 9mm ring spanner & I didnt! So managed with open one, maybe thats why I found it a bit difficult.

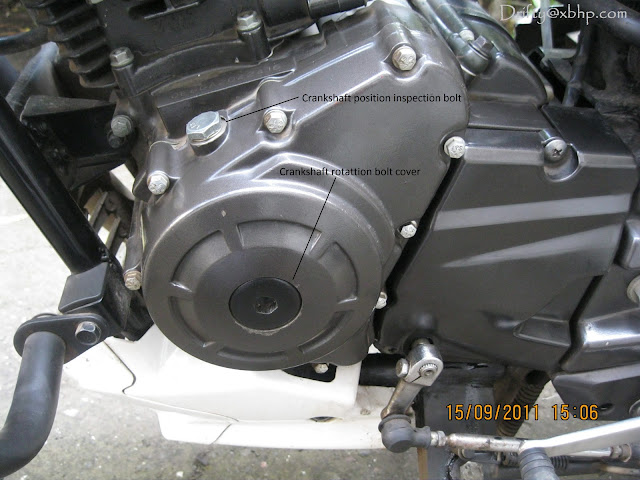
    I also managed to damage the crankshaft rotation bolt so I set it to TDC using kick lever

    Anyways thanks again for taking the time post DIY. Would have had to visit SVC again if not for this.
    Last edited by Adarsh_Bk; 03-05-2013, 03:00 PM.
    Ride hard.. Ride safe.. Always!

    S1000RR ownership experience

    You can also follow me on YouTube here

    Comment


    • #17
      Brilliant post man.. do you advice me, a person who has never adjusted tapits before to do it.? I have a basic idea on mechanics. I've opened 2 stroke engines. Never fiddled with a 4 stroke. Pls advice.

      Comment


      • #18
        hi where we get these feeler gauge strips?

        Comment


        • #19
          Originally posted by adityajohanan View Post
          Brilliant post man.. do you advice me, a person who has never adjusted tapits before to do it.? I have a basic idea on mechanics. I've opened 2 stroke engines. Never fiddled with a 4 stroke. Pls advice.
          You just need to make sure your piston is at TDC, if not in TDC then u should not fiddle with tappets. Rotate the flywheel counter clock to match the T mark with index mark on the body, then check the tappets if they are loose or light. If they are tight rotate the crank fully 360 degree and then again check the tappets and they should be loose. Now u can continue with tappet adjustment. If your crank rotate slightly while adjusting tappets then don't panic, nothing happens, valves remain close because cam shaft lobes doesn't touches the rocker arms.

          Originally posted by jjshan View Post
          hi where we get these feeler gauge strips?
          You can get in any tools shop.
          | SOL 68s | Rynox Tornado Pro | Rynox Advento | Cramster TRG2 | Scoyco MC20 | Hero 5 and SJ6 |

          Adjusting Tappets FZ25 www.youtube.com/watch?v=VhiJGtd_Xigl
          Engine Oil & Oil Filter Change www.youtube.com/watch?v=9AZ5MlXF7dc

          Visit here for more DIY www.youtube.com/c/LifeofPal

          DIY - Foam Air filter Cleaning & Oiling / Horn Repair Guide / Replacing Motorcycle Fork Oil

          Read This Before You Buy Any Halogen Bulb
          Engine Overhaul

          Comment


          • #20
            Originally posted by Drifty View Post
            Sorry for too late reply.According to the service manual of P220,its 0.05mm(intake) and 0.1mm(exhaust).The setting is done when engine is cold for more precision.

            Hi Drifty. Lovely DIY explanation. Can you tell me the clearances for a TVS Fiero? I think they are different from a Suzuki Fiero. It would be very helpful as I plan on doing it myself.
            Ride it like you stole it! But buy your own helmet.

            Comment


            • #21
              Re: Valve clearance setting-RTR180

              Hi Drifty ! I was thrilled to know that things like "valve clearance" could be attempted by a common biker,when i came across your DIY.I got confident
              enough to attempt it on my own,but got stuck at the very first step.The valve covers are so tight on my TVS Apache fi rtr 160 that i fear the bolt threads
              have been damaged.First i used 17mm ring spanner to open inlet valve cover,but some metal scraped off in the process.Then i used open ended 17 mm
              spanner in its place & some more metal scraped off.I then attempted to open the exhaust valve cover & the same thing happened again.I doubt if i
              would be able to open it ever again.What should i do now ? Please help !!!...I have also attached pics...
              Click image for larger version

Name:	100_3494.jpg
Views:	1
Size:	93.1 KB
ID:	1851066Click image for larger version

Name:	100_3495.jpg
Views:	1
Size:	85.8 KB
ID:	1851067Click image for larger version

Name:	100_3497.jpg
Views:	1
Size:	90.7 KB
ID:	1851068Click image for larger version

Name:	100_3500.jpg
Views:	1
Size:	96.6 KB
ID:	1851069

              Comment


              • #22
                Re: Valve clearance setting-RTR180

                Use some oil to lubricate the nut and try opening, as it would have got very dry.
                --------------------------------------------------------------
                Bikes owned: HeroHonda splendor 1998, Honda Dream Neo 2013
                Honda is HONDA da
                DIY:
                Carburetor cleaning Dream Neo
                Fuel line cleaning Dream Neo
                Valve clearance Dream Neo
                Oil strainer cleaning Dream neo
                Air filter replacement of Dream neo

                Comment


                • #23
                  Re: Valve clearance setting-RTR180

                  Hi, this is a very late reply but using a flat rubber band for for striped nut works wonders sometimes depending on condition.

                  Comment


                  • #24
                    Re: Valve clearance setting-RTR180

                    Originally posted by Drifty View Post
                    Valve clearance setting:
                    The valves are an integral part of an engine. They open and close, allowing in a mixture of air and petrol into the combustion chamber of the engine.After some period,the valves do not open enough, not allowing in enough air and fuel, or open too much, allowing in too much air and fuel. In either case, the engine will not function properly.Hence it becomes necessary to adjust the valves of your motorcycle to help it run smoothly.

                    To let the air/fuel mixture in to the engine we have intake valves. To let it out we have exhaust valves. However, if these valves don't open and close at the right time the engine will not run. Worse still, if the valves open at the wrong time they can be hit by the piston and bent.If you cannot get it exact then it is better to have a slightly slack tappet than a tight one.If both valves had no clearance, meaning they were both slightly held open all the time then that might give rise to some very severe starting difficulties, let alone running.Exhaust valves are more prone to damage since they run hotter than the intake valves.The intake valves are cooled by the incoming air and fuel.
                    Make sure you have all the necessary tools for this D.I.Y
                    Feeler gauge:It helps you adjust the opening of the valve.The feeler gauge has a graduated thickness all around its outer edge, from very thin to thicker. The thickness are marked so that you can match the thickness of the gap to that required by the manufacturer. This tool is helpful for measuring the thickness of the gap on valves as well as spark plugs.

                    Before you start this,the engine needs to be completely cool,bone cold!

                    Tools required:

                    1)12mm spanner(to remove the tank)
                    2)17mm ring spanner
                    3)17mm open end spanner
                    4)9mm ring spanner
                    5)Tappet adjusting tool/Forceps
                    6)Feeler gauge strip(0.06mm,0.08mm)
                    7)10mm allen key
                    8)16mm spark plug spanner and a screw driver
                    9)16mm ring spanner(for removing spark plug)-optional


                    Feeler guage:


                    Procedure:

                    Remove the tank,remove the spark plug as well(optional)

                    Step 1:Remove the intake and exhaust valve cover with the 17mm ring spanner.


                    Step 2:


                    Remove the crankshaft position inspection bolt and crankshaft rotation bolt cover with the 17mm open end spanner and 10mm allen key respectively.


                    Step 3:
                    In a 4-stroke engine,the piston reaches TDC at two strokes-the compression stroke & exhaust stroke.During the compression stroke,both the inlet and exhaust valves are closed.It is this point we have to adjust the valve clearance.

                    This step is very critical.Now insert the spark plug spanner over the crankshaft rotation bolt and turn the screw driver in anti-clockwise direction until you see a ''T'' mark in the inspection window.
                    This is to ensure that piston is at the Top Dead Center(TDC) on the compression stroke(just after the inlet valve closes).Check for some movement in the rocker arms and valve (grab it with your fingers and move it up and down,there must be some play),this will ensure that the piston is at TDC of compression stroke.


                    Ok now you can proceed.

                    Step 4:


                    Now loosen the lock nut with a 9mm ring spanner and adjust the adjustment bolt.Rotate the adjusting screw in anti-clockwise direction to increase the clearance while clock wise direction will decrease the clearance.Insert the feeler gauge 0.06mm(for intake valves),with the help of tappet adjusting tool/forceps adjust the adjustment screw so that it touches the feeler gauge.Don't tight it or it will be difficult to remove the feeler gauge back.After this process hold the adjustment screw at the same position and tighten the locknut (make sure the adjusting screw don't rotate).Re-check the clearance,the feeler gauge should go in there with a slight resistance,if not,adjust again!

                    INTAKE VALVE:


                    EXHAUST VALVE:
                    Process is same for the exhaust valve as well.Here you need a 0.08 mm feeler gauge.Generally,there is more clearance left at the exhaust valves as they are exposed to hot burnt gases and work at higher operating temperatures than inlet valves.


                    Put back everything in reverse order.

                    TIPS:
                    1)Set the valve clearance when the engine is cold.
                    2)Always use a ring spanner only for opening the valve cover,as an open end spanner might slip and damage them as they are die-cast aluminium.
                    3)Ensure that the piston is at TDC compression stroke,setting it at any other stroke will affect the valve timing & damage the engine internals.
                    4)Always use a feeler gauge of recommended size for setting the clearance for more precision.
                    5)After adjusting valves, always re-measure the clearance and re-adjust if necessary.
                    6)Removing spark plug makes it easier to rotate the crank while you adjust the valves.

                    NOTE:This procedure is more or less the same for all bikes.
                    Hi
                    My RTR 180 Does Not Have T mark On Alternator
                    PLZ Help

                    Comment

                    Working...
                    X