


 Tweet
Tweet
There has been a lot of discussion on chain cleaning but i have not seen a proper guide for cleaning of chain. So i thought of posting a DIY thread on cleaning of CBZ extreme/hunk chain. However it is applicable to all bikes like pulsar,unicorn, splendor, platina or every bike.
This is a detail guide on cleaning the chain and will take easily 2 hours. So ensure you have ample time or second bike for doing this kind of maintenance.
Why the need of cleaning chain?
Ok, this is a question which many nearby me, who knows me ask. The answer lies in my bike itself. As you know i have a joy and lets talk about chain life. Usually chain kit last for 20-40k on different bikes. But in my joy with regular cleaning and lubing every 10k the present chain kit has lasted for 87k and is still looking like new and the chain is not binding. So as you see with little maintenance we can easily extend the chain kit life by 3 times.
How to go about cleaning chain?
Cleaning chain should be done in a elaborate manner i.e by removing and cleaning all the dirt from chain, sprockets, cover, e.t.c.
How does dirt decrease the life of chain?
The dirt embeds itself on the roller, link plates, in between the roller and will cling itself because of the oil present.
The most dangerous is the sand which easily finds its way inside cover.
What it does is that with the help of oil it becomes a grinding paste which will continuously grind the chains and sprockets and will decrease their life. The chain will frequently loose tension because of grinding as it will cause play in rollers.
So the procedure for cleaning chains and making like new:
TOOLS REQUIRED:-

PLIER, T-HANDLE, 8 and 10 no. socket.

A long flat edges screwdriver for scrapping the inside of chain cover.

A pan, brush and about half liter of kerosene.

A 30 no. wrench for loosening half axle bolt, a 22 no. wrench for axle bolt and a 19 no. wrench for holding other end of axle. Here i have used a 22 no. wrench, adjustable spanner and 30 no. socket and L-handle.

Photo of the chain cover and front sprocket cover.
How to remove chain cover?
This has been asked by many Hunk owners as they feel without removing wheel we cannot remove cover.
The process is as follows:-
1. Open all the four bolts of cover by using 10 No. T-wrench and socket.
2. Hold both the top and bottom cover and lift the rear of top cover and the lower cover will come loose. Remove the lower cover.
3. The tricky part is removing top cover. For removing top cover lift the rear of top cover by approx 1 inch and slide it backwards till the front part of cover reaches rear sprocket and then lift and remove. If you try to remove by lifting directly then you cannot remove.
Now removing Front sprocket cover :-
remove the two bolts(one top and other below near gear shaft) and pull out the cover. If you see the bolts too tight then find a hollow pipe about 1 feet in length be it old fork pipes, or PVC pipe or steel rod. Now insert the pipe at one side handle of T-wrench and twist holding the pipe. The pipe will provide leverage.
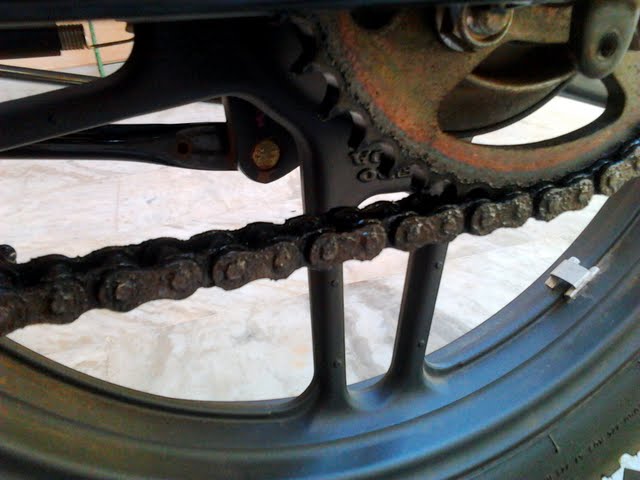
The chain after only 6k. See the dirt. If you do not clean chain regularly then this dirt with oil will act as grinding paste and damage the rollers and sprocket causing premature wear and tear.

The front sprocket cover removed. Look at the dirt at front sprocket and its surroundings.

The inside of front sprocket cover. The metal part acts as a support for the cover and while fitting back both the holes should be matched.

The master link which needs to open. Notice that the lock is fitted in opposite direction to the direction of rotation of chain.

The process to remove lock. Use plier to hold the edge of lock and the roller bush. Now clip the plier and the lock will be removed.Pics courtesy:- SHOEB
After removing lock to remove the plate hold the plate at middle by plier and pull such that both the sides are removed at equal force. If you pull the lock plate by one side it will not come out.
The Front sprocket removed.
How to remove front sprocket:-
1. Remove the chain lock and remove the chain.
2. Now put the bike into gear and use 10 No. T-wrench to open the bolts. If the bolts are tight use the method of pipe to apply more force.

After removing the front sprocket insert a old paper under the engine so that the kerosene doesn't drip on the floor. If you are married you can think what will be the consequence.
Now dip the brush in kerosene and apply it generously all over the place. Let it soak for 5 mins and once again apply kerosene on the area and use a old cloth to wipe it dry.

The picture after cleaning and wiping

Cleaning the rear sprocket. Use paper behind the sprocket to prevent alloys to get dirty. Now apply kerosene on the sprocket including the holes and let it soak. Then after 5 min apply kerosene again and wipe it with the cloth.

The rear sprocket cleaned and wiped.

The chain, master link, lock,lock plate, front sprocket, front sprocket lock and bolts all in tray and pour about 250 ml of kerosene. Now apply it on every thing also front sprocket cover and leave to soak for 15 mins.

The inside of lower chain cover. See the amount of sand in it. When the chain gets loose then it rubs against the sand and will once again get dirty. Also this will block the drain passage in cover and will cause watter logging in the cover.Use the flat headed screw driver and scrap the sand out preferably outside on soil and not on floor.

Now apply kerosene on the covers with brush inside and out.
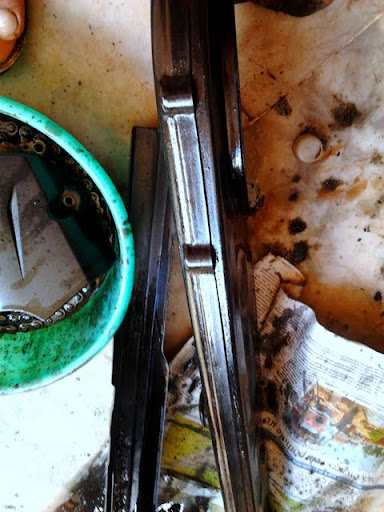
These are the drain which gets blocked when the cover gets jammed with dirt.
Will continue tommorow.
This is a detail guide on cleaning the chain and will take easily 2 hours. So ensure you have ample time or second bike for doing this kind of maintenance.
Why the need of cleaning chain?
Ok, this is a question which many nearby me, who knows me ask. The answer lies in my bike itself. As you know i have a joy and lets talk about chain life. Usually chain kit last for 20-40k on different bikes. But in my joy with regular cleaning and lubing every 10k the present chain kit has lasted for 87k and is still looking like new and the chain is not binding. So as you see with little maintenance we can easily extend the chain kit life by 3 times.
How to go about cleaning chain?
Cleaning chain should be done in a elaborate manner i.e by removing and cleaning all the dirt from chain, sprockets, cover, e.t.c.
How does dirt decrease the life of chain?
The dirt embeds itself on the roller, link plates, in between the roller and will cling itself because of the oil present.
The most dangerous is the sand which easily finds its way inside cover.
What it does is that with the help of oil it becomes a grinding paste which will continuously grind the chains and sprockets and will decrease their life. The chain will frequently loose tension because of grinding as it will cause play in rollers.
So the procedure for cleaning chains and making like new:
TOOLS REQUIRED:-
PLIER, T-HANDLE, 8 and 10 no. socket.
A long flat edges screwdriver for scrapping the inside of chain cover.
A pan, brush and about half liter of kerosene.
A 30 no. wrench for loosening half axle bolt, a 22 no. wrench for axle bolt and a 19 no. wrench for holding other end of axle. Here i have used a 22 no. wrench, adjustable spanner and 30 no. socket and L-handle.
Photo of the chain cover and front sprocket cover.
How to remove chain cover?
This has been asked by many Hunk owners as they feel without removing wheel we cannot remove cover.
The process is as follows:-
1. Open all the four bolts of cover by using 10 No. T-wrench and socket.
2. Hold both the top and bottom cover and lift the rear of top cover and the lower cover will come loose. Remove the lower cover.
3. The tricky part is removing top cover. For removing top cover lift the rear of top cover by approx 1 inch and slide it backwards till the front part of cover reaches rear sprocket and then lift and remove. If you try to remove by lifting directly then you cannot remove.
Now removing Front sprocket cover :-
remove the two bolts(one top and other below near gear shaft) and pull out the cover. If you see the bolts too tight then find a hollow pipe about 1 feet in length be it old fork pipes, or PVC pipe or steel rod. Now insert the pipe at one side handle of T-wrench and twist holding the pipe. The pipe will provide leverage.
The chain after only 6k. See the dirt. If you do not clean chain regularly then this dirt with oil will act as grinding paste and damage the rollers and sprocket causing premature wear and tear.
The front sprocket cover removed. Look at the dirt at front sprocket and its surroundings.
The inside of front sprocket cover. The metal part acts as a support for the cover and while fitting back both the holes should be matched.
The master link which needs to open. Notice that the lock is fitted in opposite direction to the direction of rotation of chain.
The process to remove lock. Use plier to hold the edge of lock and the roller bush. Now clip the plier and the lock will be removed.Pics courtesy:- SHOEB
After removing lock to remove the plate hold the plate at middle by plier and pull such that both the sides are removed at equal force. If you pull the lock plate by one side it will not come out.
The Front sprocket removed.
How to remove front sprocket:-
1. Remove the chain lock and remove the chain.
2. Now put the bike into gear and use 10 No. T-wrench to open the bolts. If the bolts are tight use the method of pipe to apply more force.
After removing the front sprocket insert a old paper under the engine so that the kerosene doesn't drip on the floor. If you are married you can think what will be the consequence.
Now dip the brush in kerosene and apply it generously all over the place. Let it soak for 5 mins and once again apply kerosene on the area and use a old cloth to wipe it dry.
The picture after cleaning and wiping
Cleaning the rear sprocket. Use paper behind the sprocket to prevent alloys to get dirty. Now apply kerosene on the sprocket including the holes and let it soak. Then after 5 min apply kerosene again and wipe it with the cloth.
The rear sprocket cleaned and wiped.
The chain, master link, lock,lock plate, front sprocket, front sprocket lock and bolts all in tray and pour about 250 ml of kerosene. Now apply it on every thing also front sprocket cover and leave to soak for 15 mins.
The inside of lower chain cover. See the amount of sand in it. When the chain gets loose then it rubs against the sand and will once again get dirty. Also this will block the drain passage in cover and will cause watter logging in the cover.Use the flat headed screw driver and scrap the sand out preferably outside on soil and not on floor.
Now apply kerosene on the covers with brush inside and out.
These are the drain which gets blocked when the cover gets jammed with dirt.
Will continue tommorow.


Comment