Since '02 xBhp is different things to different people. From a close knit national community of bikers to India's only motorcycling lifestyle magazine and a place to make like-minded biker friends. Join us

Castrol Power 1

Always keep the chain well lubricated.

Our Partner

Announcement

Collapse
No announcement yet.

Retrofitted LEDs on tailight of my P150 Classic

Collapse
X
 
  • Filter
  • Time
  • Show
Clear All
new posts

  • Shreeni0403
    replied
    Done with the soldering stuff. I am not that happy with the result
    Will be uploading the pix after i fit it to bike.

    Leave a comment:


  • Shreeni0403
    replied
    Originally posted by abhijeet080808 View Post
    @shreeni
    I gave a pattern in the prev post. Modify it as per your liking!

    Okay thank you
    Going to get the needed items now

    Leave a comment:


  • abhijeet080808
    replied
    Originally posted by Serpentkillers View Post
    @ abhijeet -- Absolutely Fantastic Job Man... Looks really Cool. Did u get the Avenger Part & howz the result?
    No man! Service center guys are saying it would take upto a month. So waiting! Anyways 60/55W bulb is supported on my bike. So, not so big prob. After getting the coil, hopeful of going upto 100/90W.


    @shreeni
    I gave a pattern in the prev post. Modify it as per your liking!

    Leave a comment:


  • Serpentkillers
    replied
    @ abhijeet -- Absolutely Fantastic Job Man... Looks really Cool. Did u get the Avenger Part & howz the result?

    Leave a comment:


  • ashish_500bullet@yahoo.co
    replied
    hii guys
    its a god job,,get some more ideas to envent new designs and enginering,,,.

    Leave a comment:


  • Shreeni0403
    replied
    Originally posted by abhijeet080808 View Post
    If you decide to use a circuit board then good. A circuit board will be like a blank canvas - plonk the LEDs where you see fit! Just cut the board in proper shape such that it can be sandwiched between the reflector and the lens.
    i asked for pattern

    And you drill using a drill, duh! I have an electric drill at home so not a problem for me. Electricians usually have them.
    Leave a comment:


  • abhijeet080808
    replied
    Originally posted by Shreeni0403 View Post
    OMG those are lovely designs, i am loving it
    Thank you very for the idea, i ll try out.

    Actually i had thought not to drill the reflector so i had an idea of putting the circuit board like this...


    So any idea u can give me on design, don't think i am greedy

    Also need some help to drill, how to drill the reflector if i think of doing so..!!
    If you decide to use a circuit board then good. A circuit board will be like a blank canvas - plonk the LEDs where you see fit! Just cut the board in proper shape such that it can be sandwiched between the reflector and the lens.

    And you drill using a drill, duh! I have an electric drill at home so not a problem for me. Electricians usually have them.

    Leave a comment:


  • Shreeni0403
    replied
    Originally posted by abhijeet080808 View Post
    Here is my suggestion -
    -
    -
    -
    You will need to adjust a few LEDs due to the 2 mounting screws behind. I am not too good with Photoshop, but I think you get the design. Let me know if you like it. Uni tail lamp has much more area to plonk LEDs compared to my itsy-bitsy tail lamp!
    OMG those are lovely designs, i am loving it
    Thank you very for the idea, i ll try out.

    Actually i had thought not to drill the reflector so i had an idea of putting the circuit board like this...


    So any idea u can give me on design, don't think i am greedy

    Also need some help to drill, how to drill the reflector if i think of doing so..!!
    Last edited by Shreeni0403; 05-14-2009, 09:12 PM.

    Leave a comment:


  • abhijeet080808
    replied
    Here is my suggestion -


    PARKING -


    BRAKE -


    You will need to adjust a few LEDs due to the 2 mounting screws behind. I am not too good with Photoshop, but I think you get the design. Let me know if you like it. Uni tail lamp has much more area to plonk LEDs compared to my itsy-bitsy tail lamp!

    Leave a comment:


  • Shreeni0403
    replied
    Originally posted by abhijeet080808 View Post
    So, you want to try it out. If your tail lamp is running on DC too, no need for rectifiers or capacitors. Quick test - if the tail lamp flickers at idle - AC else DC.
    100% its on DC

    Also, using a circuit board means that you can not use a clear lens cover as the circuit board placed between the reflector and the lens will be visible from outside. So need to use older red lens.
    Unicorn comes with clear lens only.!!

    But in case of drilling holes in the reflector and using LEDs, you can use clear lens. Also this will be more brighter.
    If drilling goes wrong then entire reflector will go kaput..!!!
    Also see the rear view of reflector, drilling might also affect the bolt which holds the reflector with chasis..
    Originally posted by abhijeet080808 View Post
    Hey can you upload a close up pic of your tail lamp so that I can suggest a pattern for the LEDs? Not able to find one on the net!
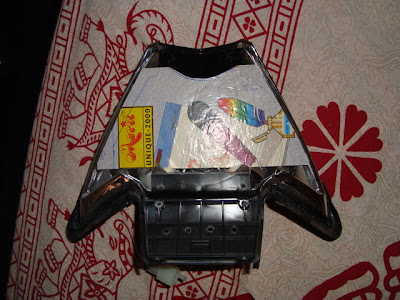
    Here it is... Removed it today to start off


    Rear View

    Leave a comment:


  • coolpepe
    replied
    Nice work mate. Will surely help lot of guys out there.

    Leave a comment:


  • abhijeet080808
    replied
    Hey can you upload a close up pic of your tail lamp so that I can suggest a pattern for the LEDs? Not able to find one on the net!

    Leave a comment:


  • abhijeet080808
    replied
    Originally posted by Shreeni0403 View Post
    Superb job done there

    Have a couple of questions

    As u know my headlights are running on DC i don't think the bridge rectifier or the capacitor is needed. Correct me please.

    This is how Unicorn's reflector looks, kindly help me or suggest me how can i cut the circuit board.


    I had put the LED's in this fashion earlier with which i am not very happy


    The LED's i have used is probably 5mm ones. I am not very sure.
    So, you want to try it out. If your tail lamp is running on DC too, no need for rectifiers or capacitors. Quick test - if the tail lamp flickers at idle - AC else DC.
    I suggest you place the LEDs on a circuit board like me. If you leave them hanging like that, it will not look good and may move out of position due to jerks and vibrations.
    Else you may drill holes on the reflector and push the LEDs from behind into the holes, this way wires will be behind the reflectors and hence not visible. Easier than creating a circuit board. But glue everything down properly.
    Also, using a circuit board means that you can not use a clear lens cover as the circuit board placed between the reflector and the lens will be visible from outside. So need to use older red lens.
    But in case of drilling holes in the reflector and using LEDs, you can use clear lens. Also this will be more brighter.

    In either case solder all the components properly.

    I will upload a pattern for LEDs shortly...

    Leave a comment:


  • Shreeni0403
    replied
    Superb job done there

    Have a couple of questions

    As u know my headlights are running on DC i don't think the bridge rectifier or the capacitor is needed. Correct me please.

    This is how Unicorn's reflector looks, kindly help me or suggest me how can i cut the circuit board.


    I had put the LED's in this fashion earlier with which i am not very happy


    The LED's i have used is probably 5mm ones. I am not very sure.

    Leave a comment:


  • abhijeet080808
    replied
    Originally posted by Thunder View Post
    Hi @abi : Can u tell me the exact shop where the Dual Colored LED's are available in Ritchie Street ---
    Ive seen many in pudhupet also the ready made LED Strips will it be usefull????
    There are so many shops in Ritchie Street. I do not remember any particular shop. Go there and ask. You will surely find one.

    They are mostly cheap Chinese made. So, quality is doubtful. Also, I guess they will cost more than the cost of doing this DIY.

    Leave a comment:

Working...
X


