Since '02 xBhp is different things to different people. From a close knit national community of bikers to India's only motorcycling lifestyle magazine and a place to make like-minded biker friends. Join us

Castrol Power 1

Keep your helmet tightly strapped up.

Our Partner

Announcement

Collapse
No announcement yet.

Converted my Pulsar 150 Classic to ALL DC

Collapse
X
 
  • Filter
  • Time
  • Show
Clear All
new posts

  • Pritansh Chandra
    replied
    Why can't I see any images attached?

    Leave a comment:


  • Sprajwal5
    replied
    Re: Converted my Pulsar 150 Classic to ALL DC

    Originally posted by dux View Post


    have done, my custom rectifier.
    Sir please share the circuit diagram

    Leave a comment:


  • Sprajwal5
    replied
    Re: Converted my Pulsar 150 Classic to ALL DC

    Originally posted by abhijeet080808 View Post
    Hi guys! My Pulsar 150 now runs on all DC. In stock condition, the headlight, tail lamp and pilot lamp (parking), console lamps runs on AC. Rest of the stuffs - horn, indicators, tachometer, brake lamp, tell tale lamps, fuel meter and the starter motor runs on DC through the battery. I converted all the AC stuffs to run on DC.

    Advantages -
    1. Nil Flickering at idle - constant brightness of headlight.
    2. HID ready - can directly install HID in place of my 60/55W light. No battery draining issues.

    The procedure is described below. Can be potentially adapted to any bikes.

    Step 1

    Prepare the AC to DC rectifier circuit. The circuit diagram is given below.


    The above circuit is a standard bridge rectifier circuit. Use only parts mentioned above. Check for correct polarity of the diodes and the capacitors.

    Thanks to rahuldevnath for helping me confirm the basic idea and provide the design of the circuit including choosing the exact components needed to build the circuit. He has this rectifier on this UGIII Pulsar 180.

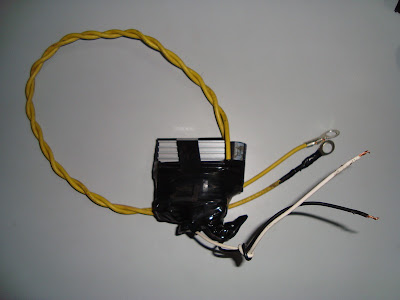
    My completed circuit -


    Look at the circuit - the extra soldering is done so that it may dissipate some heat from the diodes. I recommend a 5K resistor between the capacitor pins to ensure safe discharge of the capacitor charge when not in use. I will be connecting the resistor shortly.


    Make 2 DC wires.

    Step 2

    Now connect the wires as shown below.
    You need to modify the wiring at two places -


    At the first place separate the yellow wire from the connector of the RR unit. Now connect the wires from the custom built rectifier as shown below.


    Step 3

    Connect GND to the RR unit mounting bolt.

    Step 4

    At the second place, connect the another DC wire to the brown wire shown in the picture below. I used the brown wire at the relay. You can use the brown wire at any available point in the wiring. This brown wire is connected to the battery when the ignition is switched ON.


    Step 5

    Mount the rectifier as shown.


    That's it. Look at my console! The engine is OFF.


    Any questions - feel free to ask!
    Sir I am not able to see any of the picture you have posted please reply

    ----consecutive posts auto-merged-----

    Originally posted by Shreeni0403 View Post
    Final rectifier tested for 20mins and there was no heat in any parts. 13.xx was the charging voltage i was getting. Hope it lasts long without any hitch


    Abhijeet test your resistor design and let me know soon where to connect it.

    Thank you Rahul & Abhijeet for your support


    Sir please provide me with the circuit diagram

    Leave a comment:


  • aniXus
    replied
    Re: Converted my Pulsar 150 Classic to ALL DC

    Hi, by the way nice job buddy, but I need help.I own a pulsar 150 2006 model non digi, I did what ever mods possible cosmetically, but while installing the projector I am facing problem, everything is installed correctly but the HID isn't working well, it's sparking /blinking, but when I directly connect the HID to the ballast & then to direct battery it was working correctly, I went to the mechanic but he solved the Problem but but but, he connected everything directly with the battery, morning it was fine but night it just lasted 15min with the hid on & then the whole battery drained. What to do? What wrong, where's the problem problem yaar? Pls help?

    Leave a comment:


  • deepanpandiaraj
    replied
    Re: Converted my Pulsar 150 Classic to ALL DC

    hello guys,
    please help me to convert my pulsar 150 ug2 from 35w to 55/60w. I know this is a very old topic and a lot of information is available in threads.
    But My head is spinning from all the information overload.I'll be simple in my inquiry.

    I need to get avenger 180 coil(dv111005),but it is not available in my city.So can i use avenger 200's coil(jm111002). If yes do i need to change the rotor too?
    If i finally get to the coil,will i need a relay to connect to the headlight,What in the world is a relay?

    Somebody help me out of this nightmare.

    Leave a comment:


  • 0mnipresent
    replied
    I have apache rtr 160 and wan to change its backlight to blue.
    So can anyone help me on how the amplify voltage from 2.1v to 4v?

    Leave a comment:


  • warsimohdshafquat
    replied
    I want to make my hh splendor plus to dc to use hid

    Leave a comment:


  • sammy21
    replied
    Hi All,

    Please help. I have pulsar 200dtsi(2007) and i want to run a 35w HID.
    I have read about the BCU issue and will bypass it.
    -> Will a custom RR work ?
    -> How long will i be able to run HID with custom RR ?
    -> Will it have any bad effect on battery ?

    Thanks

    Leave a comment:


  • hgaaditya
    replied
    Bump!!,, Is there anybody who can help me out here???^^^

    Leave a comment:


  • hgaaditya
    replied
    Hey guys...well..this thread has been asleep for almost 5 months ...so kinda waking it up again..
    I have a pulsar 150 classic..and was planning on a Full DC setup like @abhijeet080808...
    I went through this thread ,but couldn't make out,which setup was finalised and tested for the classic pulsar....
    So abhijeet sir,if u r still keeping an eye on this thread please help me with the final design ..
    Any advice is welcome!! .Thank you guys!!

    Leave a comment:


  • newindia_2006
    replied
    can anyone tell me about to make my yamaha gladiator fully D.C by adding diode rectifier, i install the diode circuit to my battery but dont know how to make my lights turn on D.C circuit.
    please help me

    Leave a comment:


  • khanfrd
    replied
    sir can you please post it with pictures please?

    Leave a comment:


  • SID_BHP
    replied
    Is this suitable with my Glamour????

    well explained ino is this.
    I want to do this with my glamour it is suitable for her???
    My bike is kick start
    Reply plz

    Leave a comment:


  • insane_x97
    replied
    looks like you are going proper way, but 46 volts are too much for a 12 volt battery, check the volts with some load attached(a battery, hid's or so) as volts may be shown much greater then available with no load attached......
    enjoy tweaking.... (:
    ps... earthing creates havoc sometimes, try to note down and observe the changes/pattren on paper first then directly cutting the stuff ........

    Leave a comment:


  • dux
    replied
    discover 135 lighting coil side unground grounded wire

    i have done few things.
    please help me to find negative wire from lighting coil section. then i will forward this wire directly to bridge rectifier. i am getting 43 volts from bridge rectifier output. is it fine or not.!

    Leave a comment:

Working...
X