Since '02 xBhp is different things to different people. From a close knit national community of bikers to India's only motorcycling lifestyle magazine and a place to make like-minded biker friends. Join us

Castrol Power 1

Hot days = molten tar = slip/slide.

Our Partner

Announcement

Collapse
No announcement yet.

Converted my Pulsar 150 Classic to ALL DC

Collapse
X
 
  • Filter
  • Time
  • Show
Clear All
new posts

  • Legend Racer
    replied
    more light ....

    Originally posted by shoeb2015 View Post
    Actually nothing is safe if you don't do it correctly and tinker with stock setup.
    The recommended way is to go with Ape RR with un-grounded coils which gives Full Wave.It is tried and tested by many.

    could you please explain to this newbie....i dont know how to play with electricals or circuits..APE RR?? how to start up..or how to do with the help of an electrical mech... i too wish to convert my P 150 ug3 to DC.

    Leave a comment:


  • pavanchirmade
    replied
    Originally posted by khanfrd View Post
    hello every i am able to convert my pulsar 150 UG3 Ac to Dc but Self start is not working
    The yellow-red wire that you connected to the battery to power the headlight from the battery needs a switch on it. To use self start you have to switch this off and then once the engine cranks you can turn it on again.

    Basically you need to disable power to the headlight wire for the BCU to enable the starter. Get it? If not then PM me

    Leave a comment:


  • hemangdk
    replied
    Also i don't have any issue with this circuit, I am running my bike with all DC and also installed HID projector kit.

    One problem i have that when i do at High Beam other lights (Projector Angel Eye, Pilot Lamps and Console lamps gets quiet dull) but no flickering issue. Also other stuffs are running fine

    Could anyone help me to improve at High Beam?

    Leave a comment:


  • Abhijeet Bhattacharjee
    replied
    Originally posted by jomeshkckc View Post
    Hi friend,

    This circuit is entirely wrong. It may be kill your magneto coil at high R.P.M..
    Pulsar 150 ES can't convert to DC in this way.
    Coz one of the Lighting coil is internally connected to ground(GND or Body) in magneto(dynamo) and the other one is Y/R wire to Regulated Rectifier(RR).
    Internal grounding of magneto help to reduce the wires in the circuit. (Now the Magneto & RR wires are 6)
    This is the main risk to convert all circuit to DC.

    Now the battery charging circuit is DC. And the charging coil is separated or not grounding internally.
    But the lighting circuit is AC and share one of the AC line with Ground or negative of battery.

    If anyone convert AC to DC this way it not safe.
    If convert AC to DC use with a bridge circuit minimum four wires are required.
    Never share one AC line and negative of DC on a bridge ckt. It will be burn one bridge diode or magneto coil at high power.
    I had no issues with this setup, I used it for quite some time... tested at high revs... FYI stock DC -ve & one AC end is also shorted, doesn't cause any problem.

    Leave a comment:


  • khanfrd
    replied
    Pulsar 150 UG3 AC to DC

    hello every i am able to convert my pulsar 150 UG3 Ac to Dc but Self start is not working

    Leave a comment:


  • shoeb2015
    replied
    Originally posted by Legend Racer View Post
    could anyone please throw light to this post?i too own a pulsar 150 06 model..would like to do..high rpm is often for my bike.hence i dont want to take risks..could anyone explain the stuff at high rpms?
    Actually nothing is safe if you don't do it correctly and tinker with stock setup.
    The recommended way is to go with Ape RR with un-grounded coils which gives Full Wave.It is tried and tested by many.

    Leave a comment:


  • Legend Racer
    replied
    sort this...

    Originally posted by jomeshkckc View Post
    Hi friend,

    This circuit is entirely wrong. It may be kill your magneto coil at high R.P.M..

    The lighting coil power is reduce to half in the above circuit.
    In above circuit lighting coil half-wave shorted by one bridge diode.

    You can use a half-wave rectifier to convert AC to DC. The below ckt save your magneto lighting coil. But the lighting coil power is reduce to half as the above circuit.

    could anyone please throw light to this post?i too own a pulsar 150 06 model..would like to do..high rpm is often for my bike.hence i dont want to take risks..could anyone explain the stuff at high rpms?

    Leave a comment:


  • jomeshkckc
    replied
    Originally posted by dux View Post


    have done, my custom rectifier.
    Hi friend,

    This circuit is entirely wrong. It may be kill your magneto coil at high R.P.M..

    The lighting coil power is reduce to half in the above circuit.
    In above circuit lighting coil half-wave shorted by one bridge diode.

    You can use a half-wave rectifier to convert AC to DC. The below ckt save your magneto lighting coil. But the lighting coil power is reduce to half as the above circuit.

    Last edited by jomeshkckc; 02-14-2012, 09:18 AM.

    Leave a comment:


  • jomeshkckc
    replied
    Originally posted by abhijeet080808 View Post
    Hi guys! My Pulsar 150 now runs on all DC. In stock condition, the headlight, tail lamp and pilot lamp (parking), console lamps runs on AC. Rest of the stuffs - horn, indicators, tachometer, brake lamp, tell tale lamps, fuel meter and the starter motor runs on DC through the battery. I converted all the AC stuffs to run on DC.

    Advantages -
    1. Nil Flickering at idle - constant brightness of headlight.
    2. HID ready - can directly install HID in place of my 60/55W light. No battery draining issues.

    The procedure is described below. Can be potentially adapted to any bikes.

    Step 1

    Prepare the AC to DC rectifier circuit. The circuit diagram is given below.


    The above circuit is a standard bridge rectifier circuit. Use only parts mentioned above. Check for correct polarity of the diodes and the capacitors.
    Hi friend,

    This circuit is entirely wrong. It may be kill your magneto coil at high R.P.M..
    Pulsar 150 ES can't convert to DC in this way.
    Coz one of the Lighting coil is internally connected to ground(GND or Body) in magneto(dynamo) and the other one is Y/R wire to Regulated Rectifier(RR).
    Internal grounding of magneto help to reduce the wires in the circuit. (Now the Magneto & RR wires are 6)
    This is the main risk to convert all circuit to DC.

    Now the battery charging circuit is DC. And the charging coil is separated or not grounding internally.
    But the lighting circuit is AC and share one of the AC line with Ground or negative of battery.

    If anyone convert AC to DC this way it not safe.
    If convert AC to DC use with a bridge circuit minimum four wires are required.
    Never share one AC line and negative of DC on a bridge ckt. It will be burn one bridge diode or magneto coil at high power.

    Leave a comment:


  • shoeb2015
    replied
    Originally posted by dux View Post


    till now...i am.
    please confirm my circuit is okay.
    bridge rectifier as per shoeb2015 bhai suggestion.
    25v 4700uf capacitor added.
    rectifier ac negative (-) is empty. will i join it with black dc -ve wire.

    will update soon.
    any idea how to cover open connections.
    The solder and the wires haven't been heated properly,probably due to a low wattage iron.
    Try to use clips like this to attach wires to the Rectifier.


    You can use heat shrink tubing to cover it or use a liquid electrical tape/insulator.
    That heat-sink is big and good.
    Last edited by shoeb2015; 01-09-2012, 05:49 PM.

    Leave a comment:


  • dux
    replied


    till now...i am.
    please confirm my circuit is okay.
    bridge rectifier as per shoeb2015 bhai suggestion.
    25v 4700uf capacitor added.
    rectifier ac negative (-) is empty. will i join it with black dc -ve wire.

    will update soon.
    any idea how to cover open connections.
    Last edited by dux; 01-09-2012, 12:07 PM.

    Leave a comment:


  • Abhijeet Bhattacharjee
    replied
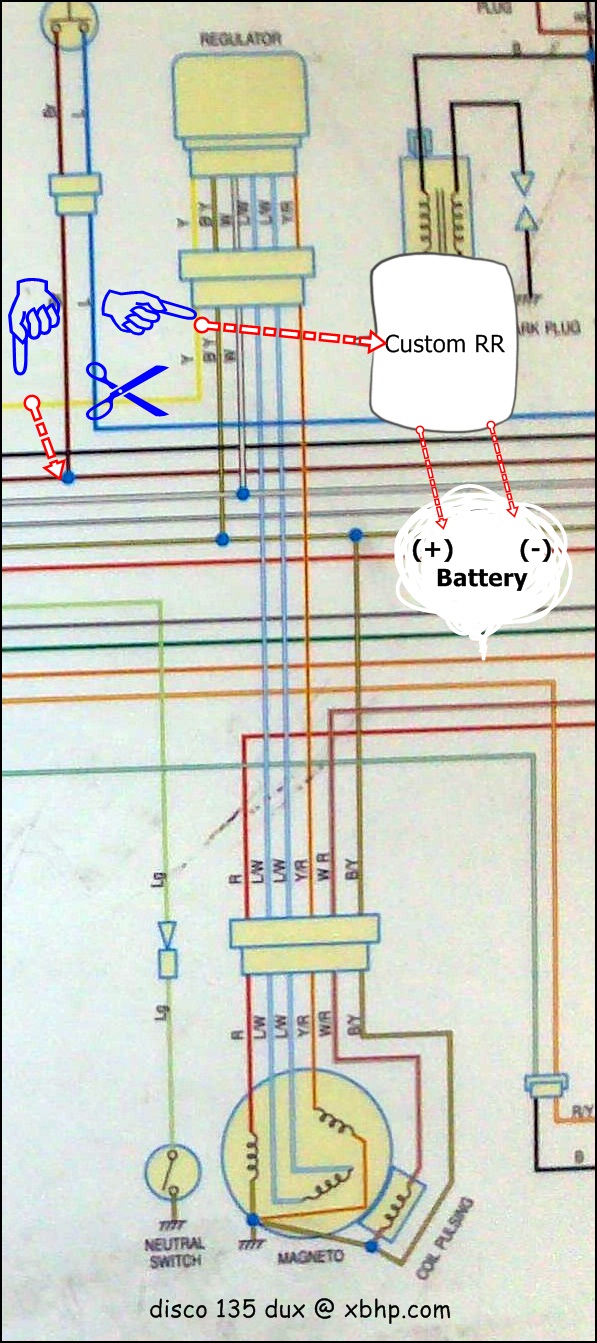
    am i correct according to this cut, tap, join steps inside the diagram.
    Cut the yellow wire between the RR & Plug so that if anything goes wrong in the future only RR change would be enough but a faulty wiring harness is not easy to fix. Rest is fine
    when things are done, will my motorcycle be on full dc.? custom rectifier is connected to a battery for all time . do there any discomfort.
    Yes, it'll be full DC. Yes the custom rectifier would always be connected, no prob.
    where is stock rr. diagram says it has a regulator only.
    There is a printing error in the diagram, that is the stock RR
    from stator coil which one is my lighting coil ac positive+ wire.?
    Y/R wire is unregulated AC into the RR & Y is the regulated AC to headlight.
    lighting coil ac negative - wire., i guess it is grounded.
    Yes, but since its AC, its not -ve. AC has no polarity :P

    Leave a comment:


  • dux
    replied


    am i correct according to this cut, tap, join steps inside the diagram.

    when things are done, will my motorcycle be on full dc.? custom rectifier is connected to a battery for all time . do there any discomfort.
    where is stock rr. diagram says it has a regulator only.
    from stator coil which one is my lighting coil ac positive+ wire.?
    lighting coil ac negative - wire., i guess it is grounded.

    Abhijeet Bhattacharjee , shoeb2015 thank you a lot for your care n support.

    Leave a comment:


  • Abhijeet Bhattacharjee
    replied
    Originally posted by shoeb2015 View Post
    @Dux

    A silicon bridge-rectifier such as MB3505 ,KBPC3506 should be more appropriate.
    It can take up-to 35 amps and it is very easy to install a heat-sink.
    Cost less than Rs.60/-
    costs 40 bucks for 40A unit.

    Leave a comment:


  • shoeb2015
    replied
    @Dux

    A silicon bridge-rectifier such as MB3505 ,KBPC3506 should be more appropriate.
    It can take up-to 35 amps and it is very easy to install a heat-sink.
    Cost less than Rs.60/-

    Leave a comment:

Working...
X