


 Tweet
Tweet
Great writeup !! Lifted my spirits out of the blue !
-
Keep me informed if you are going to Bangalore, will probably join you there.Originally posted by abhimanyu31--------------------------------
Own:
2009 Yamaha YZF-R15
2009 Ford Fiesta 1.6S
--------------------------------
Fuel Your Motoring Passion!Comment
-
Performance Racing store in Mumbai has a dyno. Pls check with Vicky Jaising there.sigpic
[email protected]Comment
-
The Assembly (Part 1)
Almost New Engine
The assembly starts with Last Out First In principle (an synonym to Last In First Out (LIFO) data structure). The first thing to do before starting assembly is to make sure that all the parts required for each stage of assembly are neatly laid out and readily available.
Cylinder AssemblyLast edited by abhimanyu31; 01-26-2011, 06:54 PM.Only a biker knows why a dog sticks his head out of a car window.
Multum in Parvo - Much in Little
"Yes, it is FAST! No, you CAN'T ride it!" - http://www.xbhp.com/talkies/general-...a-300-san.htmlComment
-
wow! wow! wow! wow!Super CommuTOURer� - Talk less, Ride more
.: FB :.|.: TW :.|*IG*| Ex PowerDrift:.
#Give thy opinion, write em, dont throw em
#Everyone errs, accept it, defending/cribbing about it only makes it worse
#Dont defend a manufacturer as if you work for them
#Write. Think. If relevant hit submit. If not hit yourself
#Be kind in your choice of words, you never know who would make you gulp em
� Satyen PoojaryComment
-
@Abhimanyu
I salute you and your writing skill.
@Joel
I am coming .Saving money for it.
Last edited by Boon; 01-26-2011, 07:56 PM.Owned - Yamaha RX100 -> TVS Fiero F2 -> Yamaha R15 -> KTM RC390
.Saving money for it.
Last edited by Boon; 01-26-2011, 07:56 PM.Owned - Yamaha RX100 -> TVS Fiero F2 -> Yamaha R15 -> KTM RC390Comment
-
Nice detailing again. keep it coming. You are making my job easy now...lol sigpic
[email protected]Comment
-
I'll collect on that... I am going to make you sign my bike & make it an official Joel edition bikeOriginally posted by Joel View Post Only a biker knows why a dog sticks his head out of a car window.
Multum in Parvo - Much in Little
"Yes, it is FAST! No, you CAN'T ride it!" - http://www.xbhp.com/talkies/general-...a-300-san.htmlComment
-
The Assembly - Part 2
Giving the R16 a New Head
The head assembly was going to be the most complicated part of this build as it involved putting together a completely new valve assembly (well, almost completely new, the valve springs were from the old setup). Before starting on the setup, I would like to comment on the parts that had been procured from the Yamaha showroom. At least till the day I bought the parts, it seems that Yamaha is still importing a large portion of the parts required for the engine assembly from Indonesia and Singapore. Therefore, for those who want to carry out a similar exercise this may be the right time to do the same.
Figure 14 is the modified head that was received from Joel. As you will note there is nothing remarkable about the combustion chamber side of the head. The ports are stock size with no alterations whatsoever. The magic is in the changes made in the exhaust and inlet tracks. The shape and angle of these tracks has been changed to improve the flow and discourage charge robbing. These changes induce high charge velocity, which is important to provide good fuel vaporization thus giving a more tractable power band.

Figure 14 - Modified new head.
The first thing to do was to remove the inner ball bearing from the old head with the help of the bearing puller. At this point I would like to point out that the said ball bearing is not sold separately and hence has no individual part number in the Yamaha Part Catalogue. It is a part of the Head assembly. However, the bearing of standard size and will be available in the market for people who are also interested in sourcing a new one.
Once the inner ball bearing was removed it was transferred to the new head with the help of a lever press machine at a nearby machine shop.
Before assembling the valves it is important to examine the condition of the valve seats and the valve face. It was observed that the valve seat machining was precise and neat. There is no roughness and the seat has a nice even feel. Similarly, the valve face is of great machining quality. To check the mating of the surfaces, a blue marker was used to mark the valve face. The valves were then inserted into the head and pressed to create an impression on the valve seat. All the four valve seats displayed a good contact to the valve faces, the ring of blue ink was nice and even.
The above observations presented us with a new factor; is valve lapping really required under these circumstances? Had we used the old valves, we would definitely have required doing the lapping process. After some thinking and debating, I called up my dad for his advice. He called up other couple of his friends and we discussed the matter on conference call. According to the new thinking, with the advent of new and better quality of machining, if the valve face and valve seats are mating perfectly then hand valve lapping is not required. Hence, the decision was taken not to lap the valves. However, please note that this may not hold true for all scenarios and for all bikes. As I mentioned these parts are being brought in from Singapore and Indonesia, when the parts are locally sourced, the scenario may well be different.
Once we had taken the decision of not lapping the valves we started assembling the head. For each valve the following steps were followed:
1. Oil the valve stem.
2. Insert the valve into the head.
3. Turn the head over.
4. Insert the lower spring seat on to the valve stem.
5. Insert the valve stem seal.
6. Insert the valve spring. Note: the more compressed part of the spring should be at the bottom.
7. Insert the upper valve spring seat.
8. Now, use the valve spring compressor to compress the spring till you can see the upper grove in the valve stem.
9. Now, insert the 2 valve cotters on either side of the valve stem.
10. Decompress the valve spring compressor and remove it.
Repeat the above steps for all 4 valves. After you have finished setting up of all 4 valves, check that the valve cotters have set properly by taking a long bit and tapping the valve tip with a mallet. If the cotters have not set properly, they will pop out (in our case, it happen with one valve). It was found that the assembly was nice and tight. It would require some careful running in to set all the moving parts.
With this the valve assembly was over. Now to insert the rocker arms:
1. Oil the rocker arm shaft.
2. Insert the rocker arm shaft through one collar.
3. Oil the rocker arm hole.
4. Place the rocker arm and align with the collar.
5. Gently tap the rocker arm shaft through with a mallet.
6. Repeat the steps of the other rocker arm.
With the above steps the rocker assembly was over.
Next insert the camshaft and bolt on the camshaft retainer. After this step insert the adjusting screws and lock nuts on rocker arms.
This is a good time to adjust the valve clearance before installing the head on the cylinder block as you get to work without the space constrains that come along with a mounted head. Make sure that both the cam lobes are point down towards the valve ports. Apply a thin film of oil on the feeler gauge. Using a feeler gauge the valve clearance were set as per the recommended factory settings i.e. 0.12 mm for intake valves and 0.22 mm for exhaust valves. Tighten the lock nut before sliding out the feeler gauge. Be careful while sliding out the feeler gauge, as the adjusting screw has a tendency to shift during this process thereby disturbing the valve clearance.
With the above process complete we have completed the head assembly. Figure 15 shows the completed head assembly before it was installed onto the cylinder block.
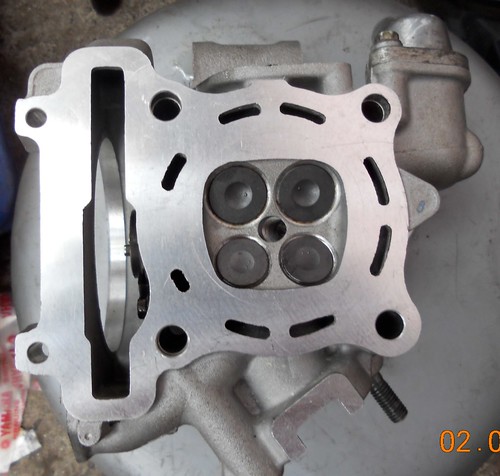
Figure 15 - Assembled Head. Note the neat assembly.
Only a biker knows why a dog sticks his head out of a car window.
Multum in Parvo - Much in Little
"Yes, it is FAST! No, you CAN'T ride it!" - http://www.xbhp.com/talkies/general-...a-300-san.htmlComment
-
Awesome as always buddy! Keep em coming.. Tooooo informative!A good rider has balance, judgment, and good timing. So does a good lover!
sigpicComment
-
Thanks for the informative posts. The next step ought to be even more interesting. Bring it on!Your biking tells a lot about the person you are!Comment
-
I don't know how I missed this thread, been researching the R15 since Jan, got my bike almost 4 weeks ago, will hopefuly doing some performance mods shortly (atleast procuring the gear before my wife returns)
Excellently written bro, please give us an update before you install the ECU.
Great stuff, enjoy
PS Any luck with the dyno?Beware of Bread, don't say I didn't warn you!
More than 98 percent of convicted criminals are bread eaters !
Statistics show that more than 75 % of violent crimes are committed within 24 hours of eating bread !
Bread is known to be extremely addictive. Subjects deprived of bread and given only water, actually begged for bread after just two days !
Bread has been proven to kill. Scientists have now uncovered alarming evidence that 100% of the people who eat bread will eventually die !Comment
-
Final Assembly
We had reached the final stage of the engine assembly. The last yard, or shall I say the home stretch. All that remained to do was to mount the head on to the cylinder, mount the engine on to the chassis and finish off the build by connecting the requisite hoses and wires. The following steps were followed to finish up the final assembly:
1. Ensure that the 2 dowel pins for the head are present in the cylinder block.
2. A fresh cylinder head gasket was installed.
3. The cylinder head was placed on to the cylinder block.
4. 2 cylinder blots were bolted in cross. For the time being these were threaded in by hand. The purpose was to hold the cylinder head to the cylinder block for further assembly steps.
5. The decompression cam was inserted into the slot.
6. Ensure that the magneto rotor mark is aligned to the mark on the magneto cover.
7. Align the camshaft sprocket mark to the mark on the cylinder head.
8. Keeping the camshaft sprocket mark aligned, mount the timing chain on to the camshaft sprocket and then mount the camshaft sprocket on to the camshaft and bolt it securely.
9. Now install the remaining 2 blots and tighten the whole assembly securely.
10. Before proceeding any further, recheck the alignment of the magneto rotor and the camshaft sprocket to the corresponding marks.
11. Ensure that the decompression lever is free and moves smoothly.
12. Once again recheck that all bolts and fasteners are tight.
13. A fresh cylinder head cover gasket was installed.
14. Dowel pin was installed.
15. The head cover installed and the bolts are tightened.
16. Crankshaft and timing access screws were installed.
17. Mount the water pump and bolt it secure.
18. A new sparkplug was installed.
19. The starter motor was installed and bolted.
The engine was now ready for mounting on to the chassis. The engine was lifted and aligned to the corresponding mounting collars and the bolts slid through. After tightening the engine mount bolts and connecting the requisite hoses, wiring and breather pipes, the radiator was filled with fresh coolant. The engine oil was then drained and replaced with fresh Yamalube mineral oil (the oil filter was also replaced).
The Exhaust SystemFirst StartHEL Break LinesOnly a biker knows why a dog sticks his head out of a car window.
Multum in Parvo - Much in Little
"Yes, it is FAST! No, you CAN'T ride it!" - http://www.xbhp.com/talkies/general-...a-300-san.htmlComment
-
^ where do I get these brake lines?
I stay in bangalore.PM me for Daytona Racing ECU for the R15
sigpicComment
 . I have been searching high and low of a dyno in Mumbai but have been unsuccessful. Satyen and Joel were helpful enough to point me to the likely places, but so far no reply from them. Also have posted the query on other forums, with no results.


Comment