Since '02 xBhp is different things to different people. From a close knit national community of bikers to India's only motorcycling lifestyle magazine and a place to make like-minded biker friends. Join us

Castrol Power 1

Stop braking before you start turning.

Our Partner

Announcement

Collapse
No announcement yet.

Convert AC/DC bike to ALL DC.

Collapse
X
 
  • Filter
  • Time
  • Show
Clear All
new posts

  • Convert AC/DC bike to ALL DC.

    Well many have accomplished this successfully on their bikes and the entire source of information is available in xbhp itself but it is scattered through out in many threads so putting up all together in one place.

    Let me start this with bikes like Unicorn/CBZ/Xtreme and any other which has single phase coil. I will leave the explanation part of Pulsar’s to Sajan and Abhi who are good at it and also the back bone behind accomplishing this successfully .
    The job is pretty much simple on bikes mentioned above.
    First of all the coil rewind done from a reputed auto electrician. In Bangalore, Ruby electricals would be a better place. Ask them just to rewind the coil without RR Unit change.
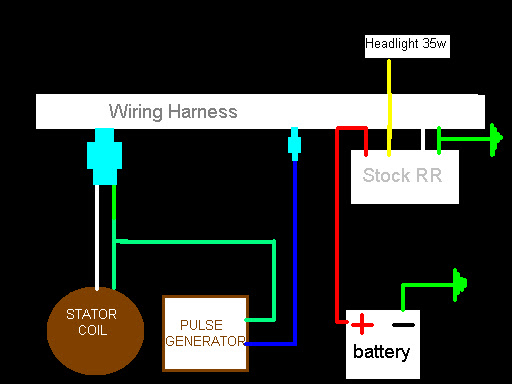
    Once the rewinding is done, tell them to remove the ground from coil. Just have a look at the below image. The coil end will be connected to ground/body and green wire will be connected to body/ground. (Red Dots) De-Solder both the terminals from ground and connect it directly. i.e connect the coil wire and green wire directly removing the connection from ground (Yellow Line).


    Now once the ground is removed, figure out the Green wire coming from Pulse generator, disconnect it and ground it to body.Check stock diagram and changed diagram so that u can identify easily.
    Stock Wiring


    Modified wiring with APE RR


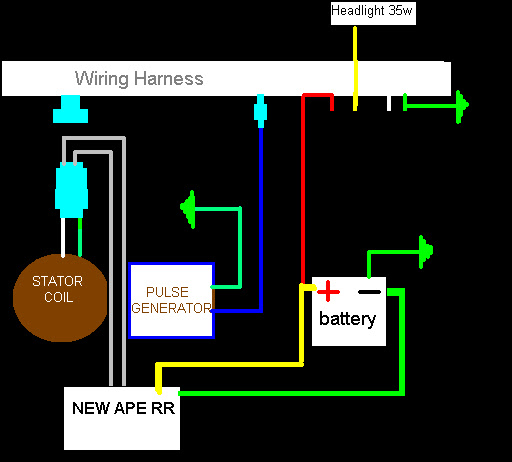
    Once this is done, don’t connect the Coil Connector to Wiring Harness; instead connect it to APE RR Unit connectors Grey color wire in APE RR picture. (Generally its direct fit connector atleast for Unicorn). Connect the yellow wire of APE RR to +ve of Battery and Black to –ve of battery. Remove the stock RR unit and preserve it safely or just disconnect it and leave it as it is. Check the above picture.

    That’s it..!! Voila you are done
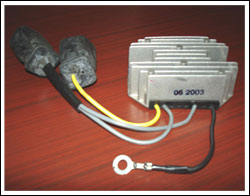
    APE RR Unit.


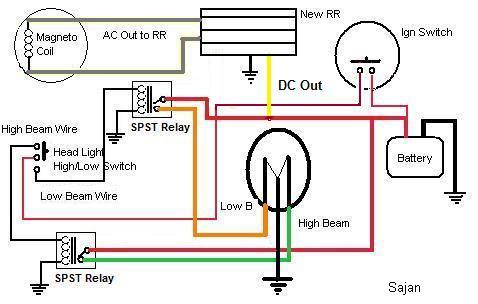
    Complete Wiring for Headlight including relay. (Put up by Sajan)


    Approx Cost Involved.
    APE RR OEM - 1100rs
    APE RR Delhi Made (Not recommended) - 600rs
    Coil Rewinding - 600-800rs

    Regarding APE RR unit, people please do go in for an OEM RR unit of APE else you might face a serious problem somewhere in mid-road without lights !!
    Use of doing all DC -

    Hassle/flicker free riding at night with higher watt bulb/HID

    Last edited by Shreeni0403; 01-20-2010, 06:13 PM.

  • #2
    Topic Moved and Approved.
    :)

    Comment


    • #3
      This will help out guys who are hungry for power & knowlegde.
      Yamaha FZ16 - 2009 to 2011
      Pulsar 220F Black - 2011.......

      Comment


      • #4
        I am ashamed of my useless post in this thread, but this is a very good initiative! Will benefit a lot of us (even the RTR guys who are still stuck in AC)
        Super CommuTOURer� - Talk less, Ride more

        .: FB :.|.: TW :.|*IG*| Ex
        PowerDrift:.

        #Give thy opinion, write em, dont throw em
        #Everyone errs, accept it, defending/cribbing about it only makes it worse
        #Dont defend a manufacturer as if you work for them
        #Write. Think. If relevant hit submit. If not hit yourself
        #Be kind in your choice of words, you never know who would make you gulp em
        � Satyen Poojary

        Comment


        • #5
          Well done Shree, its very comprehensive for all with easy step by step procedures

          And thanks for the courtseys too.

          Well, for Pulsar DC conversion is almost the same even the ground isolation procedure except with the pulse coil as its connected seperate. In Pulsar, just isolate the coil from the stator core and connect the black wire to the coil only not to the body. DOne.. Next is re routing of wires are explained as simple as every one can follow. Only thing is u need to cut some of the stock wires in Pulsar to do this job.

          Nice try Shree. Hats off to u man. Lets make this thread as a dedicated Universal DIY Elcetrical Mods
          Do it Yourself, what so ever, if Possible
          -----------------------------------------
          sigpic
          After Market HID Projector Mod for Pulsar 150
          Flasher Enabled Head Light Flash for Just Rs.1/-

          Comment


          • #6
            Originally posted by sajjt View Post
            Well done Shree, its very comprehensive for all with easy step by step procedures

            And thanks for the courtseys too.

            Well, for Pulsar DC conversion is almost the same even the ground isolation procedure except with the pulse coil as its connected seperate. In Pulsar, just isolate the coil from the stator core and connect the black wire to the coil only not to the body. DOne.. Next is re routing of wires are explained as simple as every one can follow. Only thing is u need to cut some of the stock wires in Pulsar to do this job.
            Buddy, I am bit confused with the wires, A pic would be of great help as explained in this thread and do we have to use the APE RR unit in a pulsar ug3 or a Avenger RR unit would be ok to use?
            Fun Starts at Redline!!!

            Comment


            • #7
              I didn't go for rewind or the RR swap. I installed an avenger coil and used rahuldevnath's ckt which had a rectifier to convert the AC meant for headlight to DC and charge the battery using it and connecting the headlight wiring directly to the battery via a relay. It is able to run a 35watt HID flawlessly. I was earlier running a Philips 55/65watt halogen. that too was nice bright and flicker free.
              I don't trust my own ckts thats why i have stuck to OEM parts and all. sajan, shreeni and abhijeet080808 are daredevils who push all the mods a step ahead. kudos to you people

              Comment


              • #8
                Originally posted by pavanchirmade View Post
                I didn't go for rewind or the RR swap. I installed an avenger coil and used rahuldevnath's ckt which had a rectifier to convert the AC meant for headlight to DC and charge the battery using it and connecting the headlight wiring directly to the battery via a relay. It is able to run a 35watt HID flawlessly. I was earlier running a Philips 55/65watt halogen. that too was nice bright and flicker free.
                I don't trust my own ckts thats why i have stuck to OEM parts and all. sajan, shreeni and abhijeet080808 are daredevils who push all the mods a step ahead. kudos to you people
                Basically even i want to run the headlight alone in DC and dont want the entire bike to be converted into DC, Only the headlight i.e An hid preferabbly but am afraid of charging issues, After I connect the headlight to DC, Which circuit are you referring to if i want to increase my charging rate?? A pic of the diagram and the circuit will be very much helpful.

                Thanks
                Pradeep
                Fun Starts at Redline!!!

                Comment


                • #9
                  Originally posted by pavanchirmade View Post
                  I didn't go for rewind or the RR swap. I installed an avenger coil and used rahuldevnath's ckt which had a rectifier to convert the AC meant for headlight to DC and charge the battery using it and connecting the headlight wiring directly to the battery via a relay. It is able to run a 35watt HID flawlessly. I was earlier running a Philips 55/65watt halogen. that too was nice bright and flicker free.
                  I don't trust my own ckts thats why i have stuck to OEM parts and all. sajan, shreeni and abhijeet080808 are daredevils who push all the mods a step ahead. kudos to you people
                  Even i tried using RahulDevnath's ckt, i donno why.. Probably it wont support Unicorn wiring very much, I was getting negative charge. To be precise the battery was discharging more. But what he did is exactly what we are doing here but instead of using custom made RR, we are relying on tried and tested RR of APE.

                  My Delhi made APE RR blew off and started giving 18-20v which fried my Amaron battery, Osram NB, couple of other bulbs. So i ve clearly mentioned not to use Delhi made RR's.

                  Originally posted by road_ripper View Post
                  Basically even i want to run the headlight alone in DC and dont want the entire bike to be converted into DC, Only the headlight i.e An hid preferabbly but am afraid of charging issues, After I connect the headlight to DC, Which circuit are you referring to if i want to increase my charging rate?? A pic of the diagram and the circuit will be very much helpful.

                  Thanks
                  Pradeep
                  Apart from headlight what else is running on AC ??

                  The main intention behind all this experiment is to ensure right charging rate with powerful headlights running on battery.

                  Comment


                  • #10
                    @ All
                    This setup which shreeni has mentioned is awesome. But the halogen bulbs of higher wattage say upwards of 65watt tend to fry the reflector of the stock headlamps due to the excessive heat they emit. To extract the most out of this ckt, get a round headlamp with Autopal Ambassador headlight lens and reflector ie: sealbeam. It can withstand the tremendous amount of heat emitted by even a 130 watt bulb and the beam throw is the best when it comes to round headlight.

                    Comment


                    • #11
                      I still see many people asking the same questions in different thread where data is scattered. Probably if many people request the mods to make this thread sticky it might be helpful to all.

                      Comment


                      • #12
                        Originally posted by princesirohi View Post
                        hey all listen to my theory--
                        1) my pulsar have a 9 Ah battery. HID is 12V 35W, i.e. approx. 3 Amps current. so battery should last 3 hours. now in these three hours it is getting charged also, since bike is running. i think the charging current is 1.5 Amps approx. so in three hours it will have 4.5 Ah strength, that means another 1.5 hours, so total 4.5 hours it should last. this is the ideal case. in practical terms it should last approx. 4 hours. if you are using starter then may be 3 hours back up it should give. wht do u think ?

                        2) since HID is connected to battery, the magneto coil supplying current to headlight earlier, is now lying idle, so we can use that coil, instead of rewinding the magneto. now HID is 12V 35W DC and earlier headlight was also 12V 35W AC , that means we need exactly the same amount of power as that of earlier bulb, which this coil easily produces. we need to connect this coil to one more RR unit (may be APE or may be same as that already in my bike) and connect the DC output of this RR unit to battery for additional charging.

                        3) since HID draws 3 Amps current, we need an RR unit which delivers 3 Amps. I have checked in the manual, the current RR of my bike gives approx. 1.5 amps. so now if i use one more RR as that same of my bike. total charging current will be 3 Amps approx. which should sustain the battery quite well.

                        4) can some one tell me what is the output of APE RR unit.

                        5) what if we dont use light for some days, and battery gets overcharged. is there a cut-off system provided in APE RR.

                        6) AFAIK any battery should be charged at a rate not exceeding 10% of its Ah value for safe charging and long life. too fast charging damages teh battery and reduces its life. now my battery is 9 Ah so 10% of 9 is 0.9 A. so the battery should be charged at 0.9 A only. bajaj guys are charging at 1.5 Amps is already pretty high. if i connect one more RR total charging current will be approx. 3.0 to 4.5 Amps which is too too high and i m damn sure no battery can sustain it, and will be ruined in few month.

                        only solution is that we add a switch to the wiring and use this additional charging only when light is ON, so that battery will actually not take the charging current instead it will be directly diverted to light through battery terminals. this way actually the current for light will come directly from magneto through charging current and at low speeds stability will be provided by battery.

                        what do you guys have to say?
                        Good Home work dude

                        Theoritical approach wont help u in tackling this IMO, as there are lot of other factors affecting the avg performance like the riding style, rpm, load parameters etc.

                        U've wrongly calculated the power requirement, what about the other position lights and the tail, console lights will contribute another 35-40W? Will this calculation justify? (35W HID+2x10W position lamps+ 4X 1.4 W console lights+ 5W tail light+HB will contribute 65W). U forgot few things in calculating the power requirements side, such as a normal 35W HID will consume 6-9A for 15-30 secs (depending upon the brand, almost all chinese brands are tend to be on extreme sides) at startup and later on stabilization will return to the normal power consumption of 3-3.5A. If u use a HID+Halo combi, things will be more worse, as every time u change the H/L beam its repeating the above said process of drinking more juice from the batt to stabilize bcz every time u switch the beam, the power supply also getting swapped from one beam to another beam wire. So this could severly affect the performance and life too. In a bixen too this will be the case, but there u can bypass this by a simple wiring mod.

                        Basically HID is not meant for Bikes unless u do the mods is a fact, so considering that, there might be some pros and cons to this mod too. For a healthy charging rate 10% is the thumb rule, but r u doing a proper mod with an HID on a bike? The power load also should be considered in that case, like loading with an HID means u have to depend on a 14/20 AH batt
                        too. Here U r expecting too much from a a mean 9AH batt to feed an HID which is not meant for it, so there can be a life span fall I think, but taking advantage of this HID and getting the max out of a batt cant be achieved at the same time. If u r so sure about the batt will get ruin due to this excessive charging, take the P220, is also having a 9AH batt and feeding a 55W halo which is more than an HID consumption. Without boosting the charging rate how come it can run for hrs without drain on a Halo? Nobody is replacing the batt due to this excessive charging, So there should be some balance too. AFAIK, there's not cut off circuit for over charging in any of the RRs so far. So considering all these, u've taken a risk of doing an electrical mod, so be ready to face it too. There are lot of people have
                        achived this and no one have reported for battery fault due to over charging.Once the batt reaches its level of 14.5, it wont take any more to it and hence no overcharging. I think Abhi can explain this much easier.

                        If u still not sure about this, do as u suggested by way of a switch, u can shut down the RR while no lights, pretty safe gamble.

                        This is what exactly, the APE RR does, we just re route the light coils to the APE RR to fill the batt. Its output is 1:1 for max of 20A as the charging rate is like that on it. So if u can feed more AC to it the more u will get filled in ur capacitor Got it.

                        Keeping 2 RRs is not a good idea, there can be clashes, the best u can perserve teh stock RR for an emergency in case of this RR fails. And one more thing, ur stock RR is a AC+DC type, it can feed the batt max of 3.5A with a rewounded batt coil which I've checked. And u cant bypass the light coil to the batt with a stock RR as it wont support plus, u need to get isolate the grouding from the coil core to get the full output of the coil for DC.
                        Do it Yourself, what so ever, if Possible
                        -----------------------------------------
                        sigpic
                        After Market HID Projector Mod for Pulsar 150
                        Flasher Enabled Head Light Flash for Just Rs.1/-

                        Comment


                        • #13
                          Originally posted by Shreeni0403 View Post
                          I still see many people asking the same questions in different thread where data is scattered. Probably if many people request the mods to make this thread sticky it might be helpful to all.
                          Wow! Someone finally put up the thread.

                          @Mods, a request - please make this thread sticky!
                          Your biking tells a lot about the person you are!

                          Comment


                          • #14
                            @sajjt: thanks dude for discussing with such an interest. i have just read your post. will be back after lunch time.

                            in the mean time i have found out that now all the pulsars come with all DC wiring. if only bajaj guys wud have done this earlier.
                            Last edited by princesirohi; 01-21-2010, 02:19 PM. Reason: latest discovery
                            sigpic

                            Tyre Sizes _ Spark Plugs

                            Headlight Focus _ Fork Oils

                            All India xBhp Couple Riders Thread

                            Ashtavinayak + Shirdi
                            Purandar
                            Raigad
                            Dapoli
                            Aurangabad
                            Kaas Plateu & Thoseghar Waterfalls
                            Purandar

                            Comment


                            • #15
                              Thanx guys for the new thread.
                              Will see if the bajaj service guys are willing to work on the electricals... Otherwise will go for whateva u guys said.
                              <Posted via Mobile>
                              Its the fusion of a two wheeled machine & a human being which creates a true biker.

                              Fine me on facebook: https://www.facebook.com/krazzykid.abhijeet

                              Pulsar spare parts price list (indicative only):
                              http://www.scribd.com/doc/42303845/P...re-Parts-Price
                              http://www.scribd.com/doc/99085008/Bajaj-180-Pulsar-UG3

                              Comment

                              Working...
                              X