Since '02 xBhp is different things to different people. From a close knit national community of bikers to India's only motorcycling lifestyle magazine and a place to make like-minded biker friends. Join us

Castrol Power 1

Learn & practice evasive maneuvers.

Our Partner

Announcement

Collapse
No announcement yet.

Electrical Modification on Hero Honda Passion.

Collapse
X
 
  • Filter
  • Time
  • Show
Clear All
new posts

  • #91
    Some simple images found on Half Wave Stator to Full wave | Techy at day, Blogger at noon, and a Hobbyist at night through google .

    Stock AC headlight with half wave.


    Dc conversion with fullwave


    Some odd thing i was trying . For refrence check this image
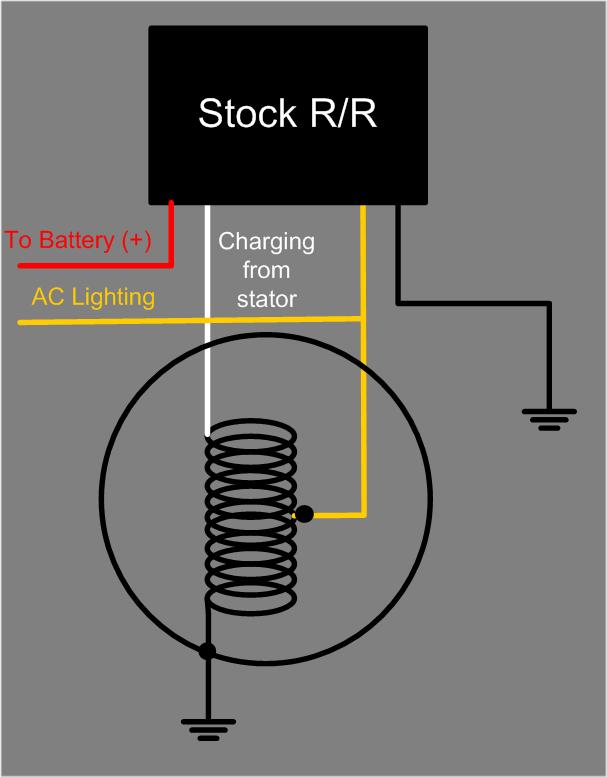


    Stock condition

    Number 1 is connected to rr with white wire & we are not going to make any changes to it.

    Number 2 is connected to rr & headlight with yellow wire .

    Number 3 is connected to Number 4 i.e. ground

    Changes we making

    Remove yellow wire joint at number 2 & make number 2 free with care not to touch anywhere

    Remove number 3 & 4 joint & make number 4 free & connect yellow wire to number 3 to utilise full wave .

    Odd Things

    I want to get wire's from number 2 , number 3 & number 4 upto outside of alternator coil & make a switch so when number 2 is connected to yellow wire , number 3 & 4 are joint . & when number 3 is connected to yellow wire both number 2 & 4 are free from connection .

    But can't configure a switch connection wiring , can anyone ?

    Reason : if anything new rr or some other goes wrong i can simply switch to stock rr with stock wiring with the switch so no need to open the alternator

    Originally posted by shoeb2015 View Post
    Hi sajjt.
    I have done full dc conversion on many 150cc bikes but never on a 100cc

    I am free this week so I want to experiment on installing a Hid(I have a spare hid left from previous mod)
    Also I will be comparing the charging rates of stock and re-wounded coil.
    shoeb can you please share the charging rates you calculated http://www.xbhp.com/talkies/help-me/...tml#post731609

    Originally posted by shoeb2015 View Post
    Get this DJ201202 : 425 rupees it comes on p180 UG4.(checked part list)
    If they have the RR in stock, go and buy it immediately and also make sure the part number matches and has only 4 wires.
    Thanks , also got the same confirmed in p180 ownership thread . Will get it once battery fitting is got completed .


    UPDATE :

    Just readed this Headlight intensity enhancer | Techy at day, Blogger at noon, and a Hobbyist at night & i was like It looking so simple in order to get some good intensity from headlight . Isnt it ? If so then how much a resistor can be a good ? 500 ohm ? & the 35/35 watt bulb will be replaced to 55/60 watt bulb , so less chances of getting bulb fused
    Last edited by Above_All; 12-02-2011, 12:59 AM.

    Comment


    • #92
      It can be done ,
      BUT
      Why do you want to make things complex and difficult?
      The pulsar's RR is a reliable one and wont conk off.
      Its a fit and forget thing.

      So before fitting a new batt.
      Un-ground the coil end ,
      Connect the un-grounded coil end to new RR .
      Check the charging Rates with Full DC.

      Let us know before proceeding.

      Comment


      • #93
        Tomorrow on sunday will test all 3 modes .

        Update :

        Thank you sajit , shoeb , utkarsha , shreeni & all for the help , completed the dc conversion today without rewinding using pulsar ug4 rr , an 5 ah battery & switched back to stock 35 watt halogen , everything is good with a test of about 1/2 hour .

        Then tried to make switches to turn from ac to dc & viceversa , need total 7 switches , it also worked .
        Last edited by Above_All; 12-04-2011, 09:19 PM.

        Comment


        • #94
          Originally posted by Above_All View Post
          Tomorrow on sunday will test all 3 modes .

          Update :

          Thank you sajit , shoeb , utkarsha , shreeni & all for the help , completed the dc conversion today without rewinding using pulsar ug4 rr , an 5 ah battery & switched back to stock 35 watt halogen , everything is good with a test of about 1/2 hour .

          Then tried to make switches to turn from ac to dc & viceversa , need total 7 switches , it also worked .
          That's great Goldi Congratulations.
          Do Post some good pictures of the RR,Battery mounting,stator coil ends floating.

          Also check the voltage and output(amps) when :-
          1.The batt is discharged .
          2. The batt is fully charged.


          Where did you mount the RR ?
          Make sure the neutral gear indicator is working.
          Did you use separate wires ?If not Make sure you use good quality wires separately to carry current to the RR and use heat shrinks at the joints.

          Seven Switches to switch from dc to ac !!!
          Please post a high res image of the stock wiring diagram of Passion so that I can make a schematic to switch from ac to dc using one switch.
          If you make up you mind to rewind the coils or any other MOD,
          Let me know so that I can help.
          Last edited by shoeb2015; 12-05-2011, 06:52 PM.

          Comment


          • #95
            Originally posted by shoeb2015 View Post
            That's great Goldi Congratulations.
            Do Post some good pictures of the RR,Battery mounting,stator coil ends floating.

            Also check the voltage and output(amps) when :-
            1.The batt is discharged .
            2. The batt is fully charged.


            Where did you mount the RR ?
            Make sure the neutral gear indicator is working.
            Did you use separate wires ?If not Make sure you use good quality wires separately to carry current to the RR and use heat shrinks at the joints.

            Seven Switches to switch from dc to ac !!!
            Please post a high res image of the stock wiring diagram of Passion so that I can make a schematic to switch from ac to dc using one switch.
            If you make up you mind to rewind the coils or any other MOD,
            Let me know so that I can help.
            I am testing it , will soon post details with the photos i snapped .

            Comment


            • #96
              Originally posted by Above_All View Post
              Tomorrow on sunday will test all 3 modes .

              Update :

              Thank you sajit , shoeb , utkarsha , shreeni & all for the help , completed the dc conversion today without rewinding using pulsar ug4 rr , an 5 ah battery & switched back to stock 35 watt halogen , everything is good with a test of about 1/2 hour .

              Then tried to make switches to turn from ac to dc & viceversa , need total 7 switches , it also worked .
              Finally... good to hear that u've done it well.

              But 7 switches Why do u need all these?

              Can't make use of the stock switch assy? Whats the bottle neck?

              Why do u want to keep the stock RR and AC lighting anymore? The new RR is also reliable as ur stock RR. Fidling with the alternator coils are not a good idea fpr a stable electricals.
              Do it Yourself, what so ever, if Possible
              -----------------------------------------
              sigpic
              After Market HID Projector Mod for Pulsar 150
              Flasher Enabled Head Light Flash for Just Rs.1/-

              Comment


              • #97
                Originally posted by sajjt View Post
                Finally... good to hear that u've done it well.

                But 7 switches Why do u need all these?

                Can't make use of the stock switch assy? Whats the bottle neck?

                Why do u want to keep the stock RR and AC lighting anymore? The new RR is also reliable as ur stock RR. Fidling with the alternator coils are not a good idea fpr a stable electricals.
                Yes done it & testing it Thank you for help

                7 switches are extra things to switch between dc to ac & viceversa with no need to open alternator cover in future . Reason is i have seen some posts in dc conversion thread where members ask is it possible to switch between ac & dc without much efforts , so regarding to that point of view i tried this experiment . Will post its details , once i get my testing done .

                Yes everything works fine with stock switch assembly but for just experimenting i made 7 switches

                Comment


                • #98
                  Where are the pictures ?????
                  Waiting for the pictures of setup.

                  Comment


                  • #99
                    Congrats on the accomplishment of AC-DC

                    But 7 switches is like James Bond car where u turn on something and something flies

                    Comment


                    • Originally posted by Shreeni0403 View Post
                      Congrats on the accomplishment of AC-DC

                      But 7 switches is like James Bond car where u turn on something and something flies
                      i would like to see how it looks, i mean the 7 switches.

                      is it a gang operated device or u switch on one by one.

                      i too had done a similar thing, when i tried the idea of parallel charging using 2 RR units, but i had only 2 switches.
                      sigpic

                      Tyre Sizes _ Spark Plugs

                      Headlight Focus _ Fork Oils

                      All India xBhp Couple Riders Thread

                      Ashtavinayak + Shirdi
                      Purandar
                      Raigad
                      Dapoli
                      Aurangabad
                      Kaas Plateu & Thoseghar Waterfalls
                      Purandar

                      Comment


                      • Originally posted by Shreeni0403 View Post
                        But 7 switches is like James Bond car where u turn on something and something flies
                        LOL

                        I am still wondering how could he use 7 switches
                        I guess its like switching on one by one in a plane's cockpit by a pilot having a checklist in hand before taking off

                        Comment


                        • Posting a couple of pictures .

                          The ac headlight wire is connected near rr & needs to be removed & connected to +12 v from key switch to make headlight dc.


                          To the 7 switches i added 1 more switch , so total no. of switches are 8 , a connection diagram of them is as below ,


                          On bike i fitted the 8 switches on the back side of tool box near carborator , so no one can imagine & get their hand their & play with them , as it is must that all switches should be in same position making bike either AC or completely DC

                          As i previously said i haven' gone for rewinding yet , the voltage at battery is maintained around 12 v , which i think is good as of now

                          Originally posted by Shreeni0403 View Post
                          Congrats on the accomplishment of AC-DC

                          But 7 switches is like James Bond car where u turn on something and something flies
                          Lol no its not like that they all needed to be in same direction always , either in up or down . But there are still some couple more switches in bike which start different things , but not like something flying

                          Originally posted by princesirohi View Post
                          i would like to see how it looks, i mean the 7 switches.

                          is it a gang operated device or u switch on one by one.

                          i too had done a similar thing, when i tried the idea of parallel charging using 2 RR units, but i had only 2 switches.
                          They are gang operated , in up position for ac headlight while in downward position for dc headlight .

                          Originally posted by shoeb2015 View Post
                          LOL

                          I am still wondering how could he use 7 switches
                          I guess its like switching on one by one in a plane's cockpit by a pilot having a checklist in hand before taking off
                          Not a checklist its position needs to be changed when you want to switch between ac & dc .
                          Last edited by Above_All; 12-13-2011, 10:02 PM.

                          Comment


                          • More Pictures will be appreciated.

                            Comment


                            • What are the charging rates ?
                              How well is it performing ?

                              Comment


                              • Originally posted by shoeb2015 View Post
                                More Pictures will be appreciated.
                                Originally posted by shoeb2015 View Post
                                What are the charging rates ?
                                How well is it performing ?
                                If you read the AC to DC conversion thread completely then you will find that only 3 things are needed to be changed .

                                1) In alternator / coil unground the grounded wire , remove the center tap yellow wire & connect it to the ungrounded terminal.
                                The picture showing that wires is attached .

                                2) Change the stock RR to a complete DC RR .
                                Check the attached picture for the position of RR

                                3) Reroute the supply wire of headlight to key switch dc connection .
                                Check the picture posted in my reply above.

                                That's it there is nothing left . As far as charging rates , in my case when engine starts there is 14 volts coming from RR to battery .

                                I think all necessary pictures are posted but if you still want the screw position pictures then will post them too.

                                Comment

                                Working...
                                X