


CHOOSING THE RIGHT MOTORCYCLE

Power: the more there is the better off you’ll be. Why? Because 1) more power means you’ll still have enough left-over when low oxygen levels at high-altitude sap your engine’s power. 2) The more power you have in reserve, the less you need to stress the engine to get acceptable performance. And a less stressed engine will improve its reliability as well as reduce fuel consumption.
Torque: The more torque you get at low rpm’s, the better it is as it’ll give your bike good climbing ability at low speeds.
Handling: You definitely need a bike that handles well and in predictable manner. As the Delhi – Leh trip using any of the two routes entails almost 2000 kms of mountain riding. Also, a well-sorted bike is less stressful to ride, both physically and mentally as it does not need constant corrective inputs and the rider can afford to relax a little while riding. Too responsive and twitchy a set-up is fine for a couple of hours of tarmac thrashing but for a long chain of long days on the road, a more relaxed set-up is not just good but a necessity.
Braking: Disc brakes are common, very effective and extremely useful in hill riding. At least the front needs to be a disc as one can live with rear drums without any appreciable loss in braking prowess of the bike.
Reliability: An aspect of utmost importance. The Ladakh region is one of the least populated places on the planet and far from expecting knowledgeable and well-equipped help in fixing a bike gone kaput, you’ll rarely find another soul on certain stretches. So look for a motorcycle that has a good record on reliability.
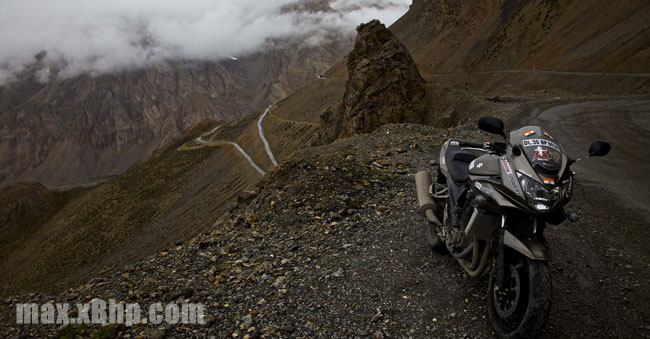
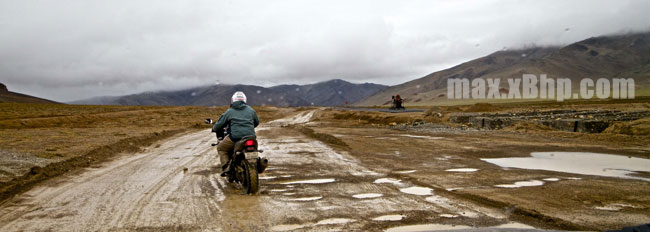
Ruggedness: Quite a large part of your riding will be in places that have little or no roads. Add the stresses of steep climbs at power-sapping altitudes, the extreme cold and the profusion of dust or slush and you’ll realize how robust and tough your bike should be. No amount of mental resolve or physical toughness on the rider’s part can fix a broken frame or collapsed suspension. If something that big and important breaks, you don’t even have the option of walking and dragging the bike left with you. So look for a proven rugged bike for this trip.
Tank Capacity/Range/Fuel Economy: Very very important as this ride entails stretches of more than 300 kms where you do not have any chance of getting fuel if your tanks run dry. Well, you can buy fuel in ‘black’ at places but then there’s no guarantee of its quality or what it’ll do to your engine a few miles down. So good fuel efficiency and large tank capacity give you the kind of distance reserves that could some day even save your life.
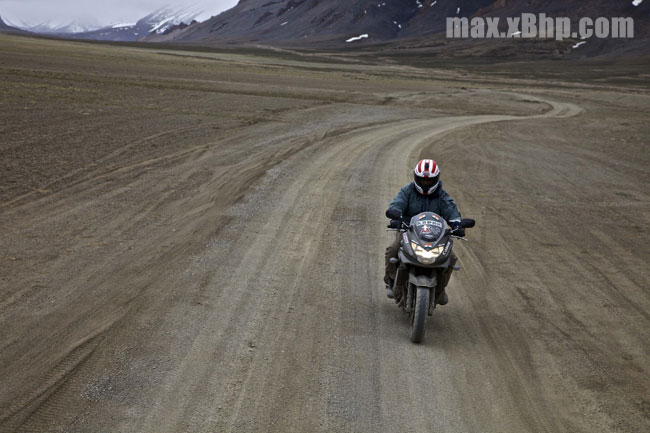
Tyres: Dual purpose tubeless are fast becoming the unanimous choice amongst bikers to Ladakh or any such destination that entails a fair bit of broken tarmac, dirt roads, slush, sand and at times even snow. The dual purpose tread pattern gives good grip and traction in off-road conditions including in soft snow. Tubeless tyres are not prone to sudden deflation and they have a tendency to lose air slowly which can be a boon and a life saver on this ride. Also, repairing them by the road-side is a relatively easy job provided you have the means of re-inflating them at hand. (see checklist for ‘vital tools to carry’). The only downside with tubeless compared to tubed tyres is the tendency for the former to lose air in case the wheel rim gets dented for some reason.
Weight: Ideally, you will be the best off with a powerful bike that makes lots of torque at low rpm’s, is reliable, rugged, has a range of at least 450kms unrefueled and is light in weight. Well, the ideal conditions are usually a bit distant from reality and weight is something you have to live with. Of course, the lighter bikes make it easy for you to wrestle them through tough water crossings, sand, slush and most importantly in picking it up in case of a fall. Choose light weight but not at the cost of power, torque, reliability, ruggedness and range.
Ground Clearance: The higher the better. The Ladakh route has places where you’ll be riding over rocks a foot high and if your bike grounds its bottom at 6 inches, then you’re as good as stopped by those remaining 6 inches. Those bikes with bigger wheels (The Bullet, Karizma, Unicorn etc) fare better both in terms of ground clearance and in handling better on rough ground.
Ergonomics: How good is the physical match between you and your bike? For a simple handlebar-foot-peg compatibility check with your physique, put the bike on its main-stand, sit on it, close your eyes and reach out for the handlebars. If the end-grips fall naturally at hand for you, then the ergo’s are spot-on for you. Bad ergonomics, say those that make you crouch or reach farther than what your natural stance permits will be a pain to ride for long hours and for days at stretch.
Seat comfort: A happy bum makes you a happy bum! The seat is something that will probably need some extra padding up with firmer foam. Usually the stock foam is too soft for a ride like Ladakh. But then those lighter in weight will not find this that big an issue. It is a matter of how much weight you put on the seat per square inch. So that’s another reason to loose those extra kilo’s before such a ride.
Ease of in-field repair: Reliability is no guarantee for zero failure. And a bike that is easy to fix on the road is a boon on such rides to remote places. The bullet scores on this as do quite a few of the Japanese designs. As a thumb rule, any bike that does not require any special tools to change its control cables, clean the air filter, adjust those tappet clearances and tune the carburetor should be the choice. Because for any other more serious issues, you’ll probably need to get the bike carried to a workshop anyways.
Fuel Injected vs Carbureted: Debatable but then lets list the pros and cons of both to help you make an informed choice.
Carburetion Pros:
- Easy access without special tools
- Most mechanics at small towns are familiar with them
- More tolerant towards dirty or contaminated fuel.
- Easier to tune
Carburetion Cons:
- Give lower fuel efficiency as precise tuning for all engine conditions not possible
- Easily affected by low oxygen levels and reduced air density at altitude.
- Less responsive under such extreme conditions
- Troublesome to start in very cold conditions
Fuel Injection Pros:
- Precise fueling so better efficiency and so better range for a given tank capacity
- The system automatically adjusts for reduced air density as altitude increases
- Positive fuel feed pressure means surer and easier starts even at very low temperatures
- Sealed unit and so less affected by rain, snow, dust, heat and vibration.
Fuel Injection Cons:
- Complex and inaccessible system which cannot be repaired by the roadside in case of a failure.
- Very sensitive to bad fuel quality
- System depends on a good and well-charged battery
PREPARING YOUR MOTORCYCLE FOR THE RIDE
Any well kept and maintained motorcycle can do this ride. We’ll give you a few pointers here and identify areas that you can take particular care to make sure your ride remains an adventure of choice than becoming one of circumstance.

The Frame: A couple of weeks before the ride, get it thoroughly washed and inspect the frame closely for any visible cracks, bends or other deformities that could indicate an impending failure when it gets a beating on the road to Leh. Look out for cracks in the paint that might have an overloaded component beneath. This is also the time to get a second or third opinion about the straightness of the bike’s handlebars. Short daily commutes do not cause any major physical discomfort even when done with an out of alignment handlebar but the long hours and days on the way to Ladakh will have you surviving on pain-killers for that sore shoulder or wrist which a straight handle would not have caused.
The Suspension: Check the shock absorbers/damping units for cracks, deformity, rebound damping etc. Check the front fork seals for oil leaks, check fork action for good suspension action. Compare static ride height with a new bike to ensure your bike’s suspension doesn’t have too much sag. Front fork alignment can be an issue but it usually is obvious enough for the rider to have it rectified soon after it happens say after a collision of due to a fall.
The Engine: Unusual engine noise, vibration, over-heating, difficult starts, intermittent idling and running and consumption of oil are pointers to an unhealthy engine. Only an experienced hand at bike maintenance can advise you here. But the point is to follow that advise to avoid a major breakdown miles from home and help.
Control Cables: Change all control cable with new ones and keep the old ones as spares. Better still and this applies specially to the clutch cables, leave the old cable where it was while you put in the new one and connect it. The old cable can be hooked up quickly and cleanly in case the new one fails.
Air filter: Change the air filter element with a new one if it’s a paper element type. Clean the foam type. In case you want to go in for a free-flow type filter, then do the changes a couple of weeks before you leave for the ride.
The Clutch and Gearbox: Both these need to be in a very good condition for you and your bike to make it through a Ladakh ride together. Take expert opinion and get the clutch plates changed a week or two before the ride (this will give them time to bed in). Usually, it is the clutch that causes apparent gearbox problems like hard or notchy shifts. If such gear issues do not get resolved even with a new clutch plate set, then obviously there’s a definite issue within the gearbox itself. Needless to say, do not ride out with gearbox issues as they will only get worse and almost surely leave you stranded at the worst possible time and place.
The Drive Chain: As vital as all the other parts put together. If in any doubt about the integrity of your bike’s drive chain or if it has been adjusted to more than half the possible adjustment range, change the chain and both the sprockets as a set. Do not ride out with a chain shortened to acceptable length by removing a link. A stretched chain means the link plates and roller pins have worn out almost to the limit. Hard stresses will make any one of them snap. And then you’re in trouble. As an added insurance for reparability though, carry a couple of master links in your spares kit.
Wheels and tyres: Go in for tubeless tyres if you can and prefer dual purpose tread patterns. Check the cush-drive rubbers of the rear wheels and replace them with new ones if the existing ones are cracked or have gone too hard. Check the wheel for any dents and alignment. Spoked wheels need balancing all the more. Make sure the tyre is mounted properly on the rim by making sure the moulding line along the tyre’s bead is equidistant from the rim all round the circumference.
The Brakes: Discs – Check disc thickness and disc pad wear. Disc thickness should be within acceptable limits (which are usually stamped on the disc itself) as too thin a disc might get warped by the heat generated during hard usage of the brake. Disc pads should have double the miles you’ll do during the trip as they will wear faster during hill riding. Check brake fluid quality and quantity. Change the fluid if it looks black or very dark. Make sure the brake feel is not spongy which indicates air in the system. Check brake hose for leaks, cracks or localized ballooning. Carry a spare set of disc pads. Drums: Check brake shoe lining. Get the drum lightly sanded and cleaned for good braking. Adjust the brakes so that you get braking once the pedal is depressed about an inch or so.
The Lights and Electricals: Check the status of the battery, especially in the case of bikes that just have a self-starter with no back-up kick start and are fuel injected. A flat battery in this case would be akin to an engine failure. Clean the battery connections and cover them with silicone grease to keep moisture out. Replace the stock head-light bulb with a better illuminating halogen. Whether you go in for an HID set-up is of course an individual decision. But make sure the re-wiring is well done, keep a relay and ballast as spare and make sure the HID mountings are as strong as they can be. Check all major connections, spray them and the switches with WD-40 and harness the wires in a way that they don’t rub against the bike body or the frame. Turn the handle lock to lock to check for this.
Seat: get a layer of high-density foam added to the stock foam but make sure the ride height does not increase to uncomfortable levels. Make sure the seat cover is a tight fit or it will wrinkle and pucker in the crotch area and make life difficult for you with the resulting chaffing of the groins.
Luggage options: Saddlebags, Panniers, rucksacks or dufflebags tied to the pillion seat. Tank bags for up front. The choice is enormous and each has its own advantages and disadvantages. Saddlebags and panniers become a must if you’re riding with a pillion. But whatever choice you select, make sure to wrap your stuff in polythene bags/waterproof fabric before putting them into the luggage. Rain, slush and dust will be your incessant companions and only an impermeable barrier like the above mentioned will keep your things, clothes, food, equipment and medicines safe and clean. Do not carry a rucksack on your back. You will strain your neck muscles in a day or two as this ride entails the worst roads you can think off. Make sure the mountings and frame for the panniers is doubly strong compared to what worked for you during other ordinary rides. This is off-road territory and the jumps and bumps will put unthought of loads on the mounting points. Carry spare bungee cords/elastic nets and some nylon clothesline for emergency tie-down purpose.
PREPARING THE MAN HIMSELF
A perfectly serviceable bike, a full complement of luggage, spares and all other necessary stuff will make for a great ride only if you – the rider are prepared, fit and capable of using that collected and collated hardware to the hilt. Even though a ride like this ha more to do with a positive attitude in the face of adversity, the physical self too needs to be capable of translating those positive thoughts into action.
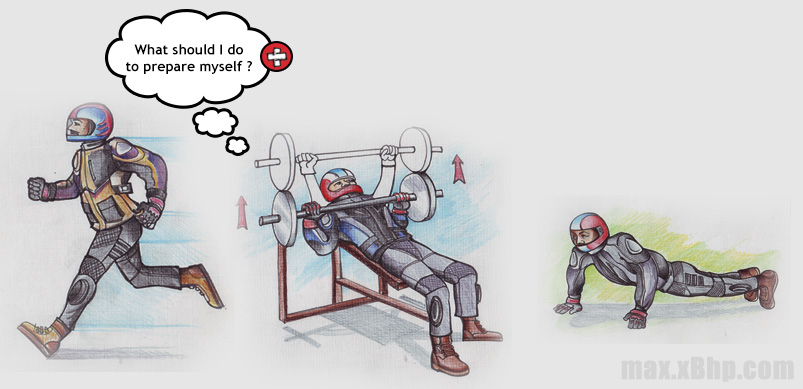
Physical Fitness: A motorcycle ride to Leh is as physically taxing as you can get while touring on a motorcycle. Rallies take the same route but add the element of speed and the pressures of winning and losing to make them more physically stressful. But a simple tour is almost as tough and so you need to be in good physical shape for it.
As your pre-ride preparations, focus on endurance training and stretching exercises. Lifting heavy weights and building those 20-inch biceps will not help much up there. In fact the added muscle bulk and volume will put additional physiological demands on your oxygen and hydration starved system. Being lean, strong and supple is the key though a touch of fat does add to reserves and insulation (a consolation for the likes of me). So focus on brisk walking, jogging, swimming, high-repetition low-mass weight training, stretching and breathing exercises targeted at improving physical endurance. Your reference markers for improvement can be slower breathing and heart-rate values taken at rest. A resting pulse of anywhere between 65-70 is indicative of good fitness.
Begin a conscious hydration programme 3-4 days before the ride by increasing both frequency and quantity of your water intake. Primes your kidneys and other support organs to handle more water and cleanses your system of accumulated toxins.
Eat healthy and sleep well for at least a week before the start of the ride. This will keep you fresh and stay away from any kind of fatigue for a longer period of time.
The fact that you’re planning a ride to Ladakh should mean that you’re already a reasonably experienced rider. THIS RIDE SHOULD DEFINITELY NOT BE YOUR FIRST INTRODUCTION TO MOTORCYCLE TOURING. That said, do a couple of long 300-400 km round-trips a few weeks before your ride, with the bike loaded as it would be for Ladakh and get used to the handling, braking and your own fatigue on the saddle.
A few hours of off-road riding practice will only help as quite a large part of a ride to Ladakh is off-road. .
And last but not the least, ride out to enjoy the ride. Don’t make it a ‘chase to conquer’ certain places and heights. Be humble towards Mother nature, thanking her for allowing you to pass through and enjoy her beauty and magic. In places like you’ll be riding through, a bad turn of weather or a landslide etc can wipe out miles of road and anything that gets caught on it.
MEDICAL EMERGENCIES
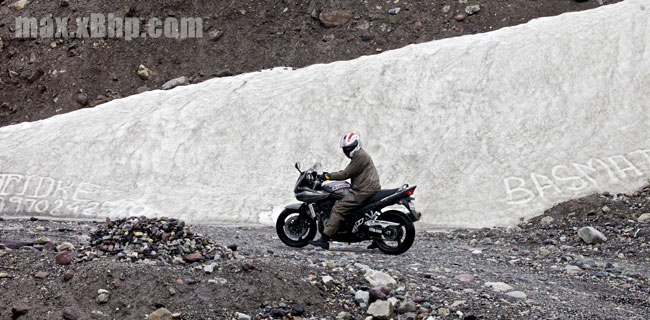
Most of us live at the bottom of the ocean of air we call the atmosphere. As we climb high or gain altitude, the pressure outside decreases and with it does the density. Our atmosphere contains about 21% of available breathable oxygen by volume and even though this ratio remains the same all through, the quantity of oxygen reduces with the reduced amount of air at high altitudes. This reduction in breathable oxygen makes us ‘sick’ as our bodies are used to living in higher concentrations of oxygen. And this reduction continues to trouble us till the time our body adapts or ‘acclimatizes’ to that lower oxygen content. This acclimatization takes time in terms of days and we being impatient and having means to rapidly gain altitude in a matter of hours, suffer acutely. So much so that too much a gain in altitude in too little a time span can even prove fatal for us.
DE-HYDRATION
Higher altitude means faster breathing and of course more effort at doing things than at sea- level. Both these factors imply that you’ll lose more water through breathing and perspiration. Add to that the fact that air at altitudes places like Leh is located is very dry and so it robs your body of significantly more moisture. As a motorcyclist, the dry wind will only make the situation worse. So if you do not consciously increase your fluid intake, you’ll in all probability end up dehydrated. This will only mean that you get AMS quicker.
Avoiding it – The usual thumb rule used by most mountaineers is to drink about 8-10 glasses of water a day when you’re riding. The colour of your urine or rather the lack of colour there is a useful indicator of your level of hydration. Clear urine means a hydrated body. But in your enthusiasm to stay hydrated, avoid over-hydration as that will encourage water-retention in your body cells and would also accelerate the onset of AMS.
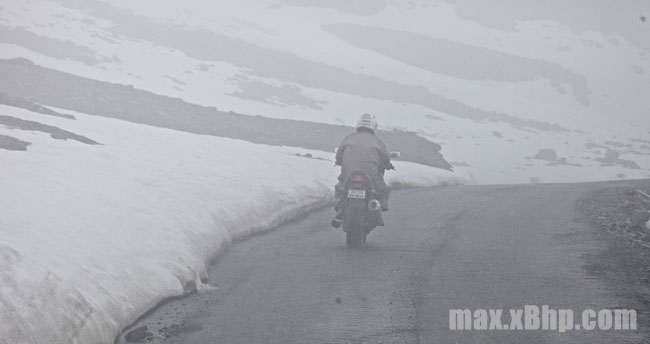
HYPOTHERMIA
Our body reacts to exposure to cold by shivering to generate heat. When exposed to extreme cold conditions (sub-zero temperatures) and without adequate warm and protective clothing, shivering isn’t enough and the body’s ‘core’ temperature begins to drop below 98 deg F. ‘Core’ here implies the inner organs of the body like liver, lungs, stomach etc . That’s hypothermia. And when that happens, you’ll go drowsy, lose strength, have incoherent thoughts and slowly slip away into a sleep that you’ll never wake up from.
Avoiding it – Dress in enough layers to keep warm in the coldest weather you’ll encounter, eat well and keep hydrated. Warm clothes, hot food and adequate fluids will see you ‘breeze’ through the coldest of winters.
FROSTBITE
Frostbite and hypothermia are brothers in arms. In freezing conditions, the water present in our body tissues chills to the point of freezing. This cuts it off from the regenerative powers of blood-circulation and if prolonged for even a few hours, that tissue is irreversibly damaged. The nose, cheeks, ears, fingers, and toes (your extremities) are most commonly affected. In conditions of prolonged exposure to freezing temperatures, the body constricts the blood vessels in your arms and legs. This way the body preferably sends blood to the vital organs, supplying them with critical nutrients, while also preventing hypothermic cooling of the body exposing less blood to the outside cold. Water in the tissue starts freezing, its capillaries get blocked and the issue dies.
Avoiding it – Use good gloves double layer of socks inside thick leather shoes and keep your nose and cheeks covered by wearing a balaclava in freezing conditions. In case your fingers or toes freeze or go feelingless, warm them at a safe distance from a fire or dip them in water not exceeding 45 deg C. Keep wiggling your toes inside the shoes and fingers moving to encourage blood circulation.
WIND CHILL
Wind-chill is the combined cooling effect of air, temperature and wind on a heated body, rather than temperature as shown by the thermometer. This means that it is a lot colder when the wind is blowing than what the thermometer shows. The effective temperature is lowered in the presence of heat robbing wind. The higher the speed of the wind, the greater is the temperature drop. To grasp the seriousness of the issue, if still air temperature is 0 deg C, then a rider riding at 60 kph will in effect be exposed to – 20 deg C, which is prime hypothermia/frostbite territory. These figures are for dry conditions. Wet clothing retains as little as one-tenth of its insulating value and even fog or mist could get you wet enough.
Avoiding it – So overdress while standing and never forget to have a top layer of windproof/rainproof clothing for your Ladakh sojourn.
SUNSTROKE AND SUNBURNS
There’s an apt saying about Ladakh. “Only in Ladakh can a man sitting in the sun with his feet in the shade suffer from sunstroke and frostbite at the same time!” and it is true. It’s the altitude and the clear atmosphere that lets the sun shine upon you in all its ferocious glory. And so sunburns and sunstrokes are an unexpected reality that needs to be protected against. In fact sunburns become all the more easy to get in winters as the snow all around reflects sunlight and can double its intensity.
Avoiding it – Keep your limbs covered and use sunscreen on exposed skin to avoid sun-burns and wear a cap when not wearing your helmet to avoid sun-stroke. The intense sun heats up your head and the body’s temperature control goes haywire. If affected, you’ll feel thirsty, dizzy, possibly high temperature and unduly fatigued. To affect a cure, get out of the sun, rest under shade, drink plenty of fluids and avoid exposure to the sun for a day or two.
BACK PAIN
A motorcyclists’ back usually takes a beating during long rides and this is all the more accentuated during a ride into rough terrain as found in and around Ladakh. Constant riding over broken roads strains the back, neck, shoulders and wrists to the point that they start aching badly.
Avoiding it – While such aches and pains will remain a reality on this ride and cannot be completely eliminated, proper riding posture, using your legs to cushion the shocks, proper working suspension, a good seat, frequent rest during long riding stages and good physical fitness levels can make a big difference towards lesser pains and aches.
CHAFFED SKIN
Long hours on the saddle means that the crotch and buttock area stays in constant contact with the seat of the bike. Bumps, braking and acceleration etc cause you to move up, down and sideways in the saddle. This movement causes friction between your skin and the clothing you’re wearing. Also, lack of ventilation to the groin area means persistent perspiration. This softens and sensitizes that skin locally and friction causes surface wounds called chaffing. That part of the skin burns and pains as if lacerated.
Avoiding it – Remedies include long underwear made of absorbent fabrics like cotton, liberal use of some antiseptic ointment on the skin folds, avoiding garments that have thick seamlines which will form pressure points on your skin, good personal hygiene of the crotch area specially and frequent ‘bum-off-the-saddle’ stops will help avoid this problem.
ACUTE MOUNTAIN SICKNESS
Most of us live at the bottom of the ocean of air we call the atmosphere. As we climb high or gain altitude, the pressure outside decreases and with it does the density. Our atmosphere contains about 21% of available breathable oxygen by volume and even though this ratio remains the same all through, the quantity of oxygen reduces with the reduced amount of air at high altitudes.
This reduction in breathable oxygen makes us ‘sick’ as our bodies are used to living in higher concentrations of oxygen. And this reduction continues to trouble us till the time our body adapts or ‘acclimatizes’ to that lower oxygen content. This acclimatization takes time in terms of days and we being impatient and having means to rapidly gain altitude in a matter of hours, suffer acutely. So much so that too much a gain in altitude in too little a time span can even prove fatal for us.
Disclaimer: The information disseminated and recommendations of suitable drugs given here is NOT a substitute for qualified medical advice. Please consult a qualified doctor before proceeding with consumption of any of the medicines discussed here.
This sickness, aptly termed ‘Acute Mountain Sickness’, usually affects us at altitudes higher than 2500 mtrs (8000 ft) above mean sea level (AMSL). Our first feel of reduced oxygen in the air is by getting breathless during activities that would be commonplace to us at home. The body strives to adapt and so our breathing patterns change along with other physiological changes. We breathe deeper and quicker, we urinate more frequently and the fluid/electrolyte balance of our blood changes. Whenever the oxygen balance of the body is upset i.e. you cannot replace as much oxygen through breathing as you consume, an oxygen debt occurs (called Hypoxia) and you enter the AMS zone. In fact our body has a certain ‘tolerance range’ for lowered oxygen levels and as long as your gain in altitude lies within this ‘tolerance range’ you shall be fine. In fact, acclimatization is a process of extending this tolerance range further towards lower levels of available oxygen. To avoid AMS completely, you need to limit your daily gain in altitude to where it remains within your tolerance range. Usually this amounts to about 1500 ft (500 meters) in vertical height as ‘sleeping’ altitude. Sleeping implies that even if you exceed a gain of 1,500 ft during your day travel, you should not sleep at a place that’s higher than 1500ft from the place you slept the previous night.
As motorcyclists who can cover lots of distance (both horizontal and vertical) during a riding day, that’s usually far from what we do. We typically end up way higher than the ideal at night, especially on routes like Manali – Leh. So AMS expectedly affects most of us, a lucky few escaping due to some unknown physiological advantage or previous exposure to that altitude say within the last few months. The accompanying chart details the symptoms of AMS and its two more serious and at times fatal iterations vis a vis High Altitude Cerebral Edema (HACE) and High Altitude Pulmonary Edema (HAPE).
Both HACE and HAPE are the most severe forms of AMS and need emergency descent to lower altitudes in sync with proper medical attention. Fortunately, this would be a rare occurrence for motorcyclists even on the Manali – Leh route as long as the riders’:
- Don’t get adventurous enough to stay the night on top of high passes and descend as low as practical for the night e.g. Bharatpur,
Sarchu, Pang etc. - Refrain from smoking, consuming alcohol (the latter reduces breath-rate and so worsens hypoxia), taking sleeping pills and narcotics.
- Exert only as much as is necessary
- Remain hydrated and eat light food
It is the best to acclimatize naturally even if it means an extra day in the itinerary. My old favorite method for the Manali – Leh route is to ride to Rohtang Top the day after arriving in Manali, spend the entire day lazing around above 12,000 ft, keep myself hydrated with soups, tea and water and return to Manali for the night. Leaving for Leh the following morning, I have rarely faced anything more than mild AMS during my night stay at Sarchu. For those who insist on accelerated acclimatization, Diamox (Acetazolamide) is the usual recommended though with its own disadvantages.
- It’s a Sulfonamide salt and those allergic to Sulphur should not use it.
- Numbness and tingling in extremities (hands & feet) and the edges of the lips
- Carbonated soft drinks play havoc with the taste buds. It’s like drinking liquid electricity!
- Ringing in the ears and/or tinnitus is also pretty common as is blurring of vision.
- Diamox is a mild diuretic and so you’ll lose more water through frequent urination, thus increasing the risk of dehydration.
The usual recommended dosage for adults is about 125mg twice a day (12 hrs between doses). The same dosage can be started a day before gaining altitude as a preventive. BUT REMEMBER THAT EVEN IF YOU’RE ON DIAMOX, A RAPID ASCENT (>2,500 FT sleeping altitude) COULD STILL LEAD TO SEVERE AMS.
The other drug commonly discussed and used for AMS is Decadron (Dexamethasone). This is a steroid used primarily to treat swelling of the brain tissue. While Diamox treats the ‘problem of AMS’, this just treats the symptoms. It does not help in acclimatization and can in fact mask the symptoms of AMS. This masking can bring about a false sense of security and the rider would continue higher even when not fit for altitude gain. Decadron is NOT A SUBSTITUTE FOR DIAMOX. It is meant to treat HACE and that is where it should be used. And certainly not without proper medical direction.
All said and done, there are 3 golden rules for avoiding, managing and treating AMS that mountaineers follow unquestioningly. And we motorcyclists can certainly take this leaf out of their books. The 3 rules are:
1. If you feel unwell at altitude, assume it is AMS unless categorically proven otherwise
2. Never, never continue to ascend with symptoms of AMS
3. If your AMS symptoms get worse with time, descend at once.
| COMMON MEDICINE KIT | QUANTITY | WHY TAKE IT? |
|---|---|---|
| Gauze Bandages (1″ & 2 “) | 4 each | Big injury dressing |
| Savlon Liquid | 1 bottle | Antiseptic cleaning liquid |
| Calendula Ointment | 1 tube | Antiseptic ointment |
| Boroline Cream | 1 tube | Rashes, chaffed skin etc |
| Burnol ointment | 1 tube | Burns |
| Cotton (rolls) | 2 small packs | Injury dressing |
| Bandaid Strips | 15 | Small injury dressing |
| Diamox Tabs (125mg) | 10 | Preventive for mild AMS |
| Digene Tabs | 10 | Antacids |
| Voveran SR Tabs | 10 | Pain-killer |
| Dependal Tabs | 10 | Diarrhea |
| Combiflam Tabs | 10 | Fever and body-ache |
| Perinome Tabs | 10 | Anti nausea |
| Electral Packs | 3 | Oral rehydration solution |
| Elastic Bandage (2″ type) | 1 | Sprains, muscle tears etc |
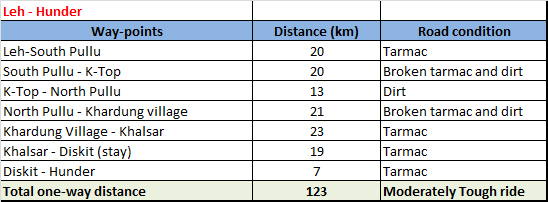
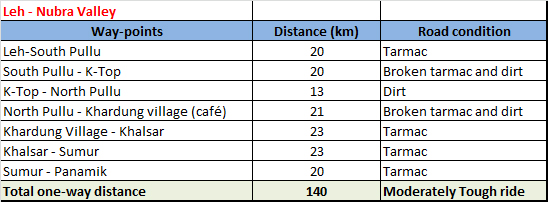
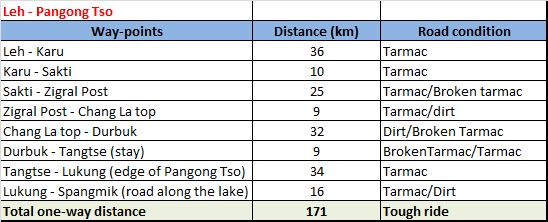
IN AND AROUND LEH
These permits, called the Inner Line Permits, can be easily obtained from DC’s office in Leh Town at a very nominal fee that is taken as contribution towards district Red Cross fund. You need to fill in a few basic details about yourself, the places you want to visit, the duration of your movement in those areas along with a copy of your identity proof. To make things easy, plan your itinerary and add 3-4 days to it before filling in the dates on the form. This way, even if you get held due to weather or road blockage, you will not have to run to the DC’s office again to extend the duration of the permit. You can also get the permits through your travel agent for a little extra charge within 2-3 hours on any working day. Also get the permit photocopied. At least 4 copies for every region you have listed for the permit. You will need to deposit a copy of the permit at each check-post you cross.


 \
\


